Remove the Motor Box Gasket
This section explains how to remove the gasket between the base plate and the blue box cap.
It is possible that the electronics of the motor box do not correctly detect the revolutions of the motors, which either leads to a blocked stop error message or to the sector control occasionally controlling slightly incorrect angles.
Toolkit
- Allan Key 3 mm
- Wrench 13 mm
-
TORX 10
Dismounting the Motor Box
The motor box is dismounted in exactly the reverse order to installation. [Install the Motor Box Correctly]
-
Switch off the motor box.
-
Use the Allen key to loosen the two screws on the caps above the belts.
-
Use a 13 mm open-end wrench or a ratchet with a suitable socket to remove the two central nuts
underneath the motor box. -
Remove the belts from the belt pulleys.
-
Disconnect the cable that runs from the motor box to the sensor above it.
-
Remove the blind cap on the back of the motor box.
-
You can now pull the motor box forwards out of the guides.
Should I Remove the Gasket?
The motor box can be opened by removing the 4 TORX-10 screws.
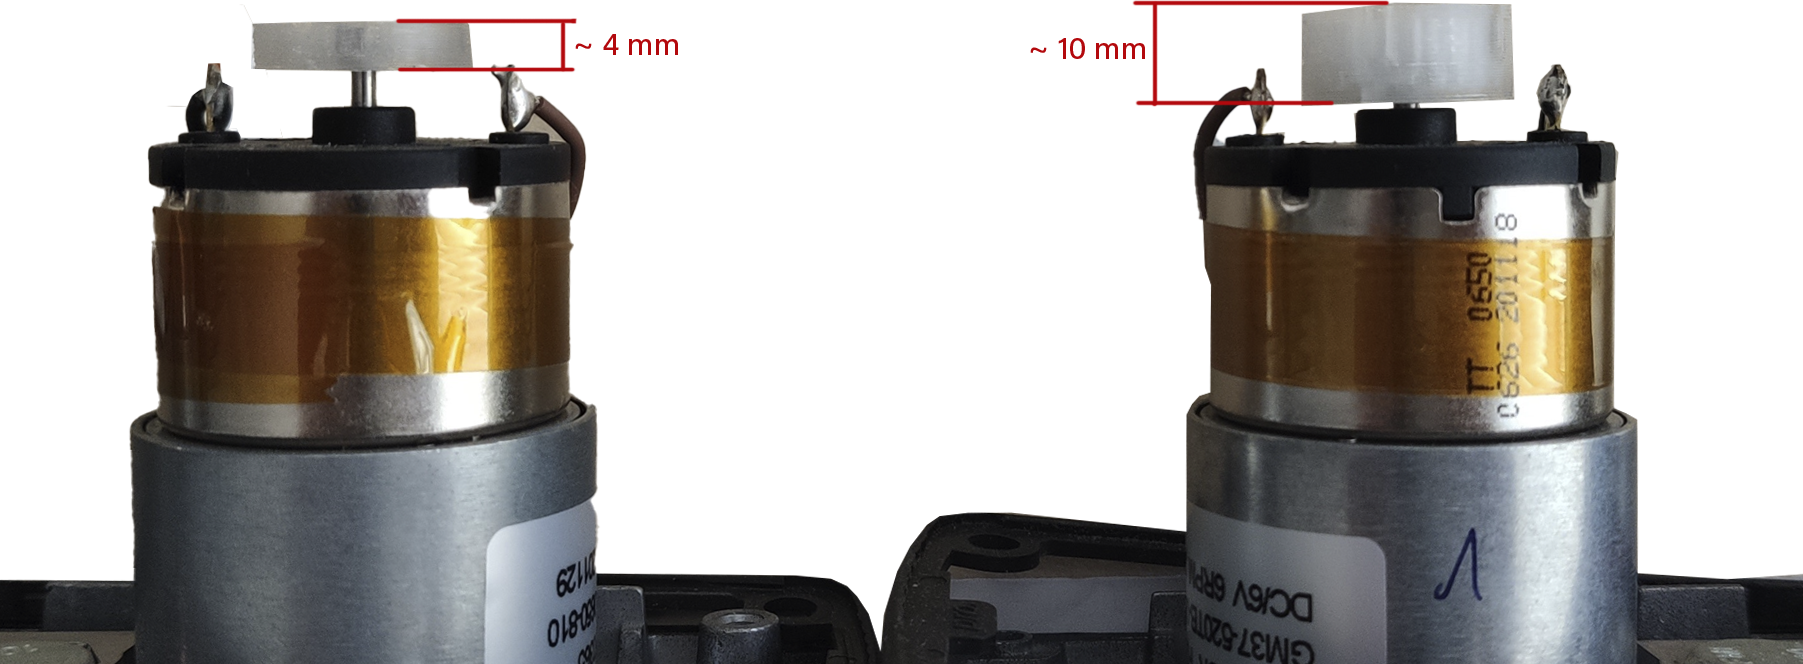
To decide whether removing the seal is the solution for you, look at the magnetic discs on the motors.
If your motors are equipped with smaller magnetic discs, it may help to remove the rubber gasket.
Removing the gasket allows the base plate to come around 2 mm closer to the sensors in the cover of the motor box, so that the revolutions of the motor can be counted correctly again.
You can simply pull the gasket down over the base plate without having to disconnect the motor cables.
If your base plate is already equipped with the bigger magnetic discs, this fix will not help and you will therefore need a base plate with new motors. Please contact our support team and we will organise the shipment of a replacement part as quickly as possible.
You can find more information on this topic here Replace motorbox base plate assembly
Installing the Motor Box
To install the motor box, please follow these instructions.
-
Insert the motor box with the spacer plate directly pressed on the base plate of the motor box in the mounting.
-
Slip on the belt.
-
Tension the belt by pulling the motor box forwards.
-
Make sure that you tighten the belts, but neither too tightly nor so that the belts can skip.
Ideally, you can still squeeze the belt together a little -
Tighten the nuts under the motor box one after the other under tension.
-
Now plug the cable from the motor box into the upper sensor.
-
Set the stops to a +90/-90 position (semi-circle) and switch on the motor box.
-
Switch on the motor box.
-
After successful adjustment, you can refit the belt cover
-
Do not forget the blind cap on the back.
No Comments