Create a Run
Irrigation runs permanently stores the path of the irrigation machine in the system. This information offers several advantages in the daily use of the Raindancer app and sector control.
Why do you need runs?
- Length of the irrigation path
If an irrigator starts on an run, the Raindancer recognises this and the length is known immediately. - Positioning of the hose reel
Especially if you do not position your hose reel exactly at the border of the field, e.g. in the headland, the irrigation system may not reach the field border. The exact location of the hose reel (the target point) is determined by the run. - Do you have irrigators that also run in a "curve"?
You can also use runs to draw curved paths.
This is particularly important if you are working with sector control to calculate the stop angles correctly. - Information on when and how much was irrigated here.
This is permanently displayed on the run:
- Last irrigation with date and quantity
- How much was irrigated on the alley in total this year? - Irrigation runs serve as the basis for certain reports.
Certain analyses within Raindancer rely on the allocation of water to specific sub-areas of the fields, such as the field evaluation report. - Runs are the basis for operational planning/implementation
Creating Permanent Runs from old operations
Once irrigating a field, you can create permanent runs from old irrigations. The runs
then remain permanently available.
This is how it works ...
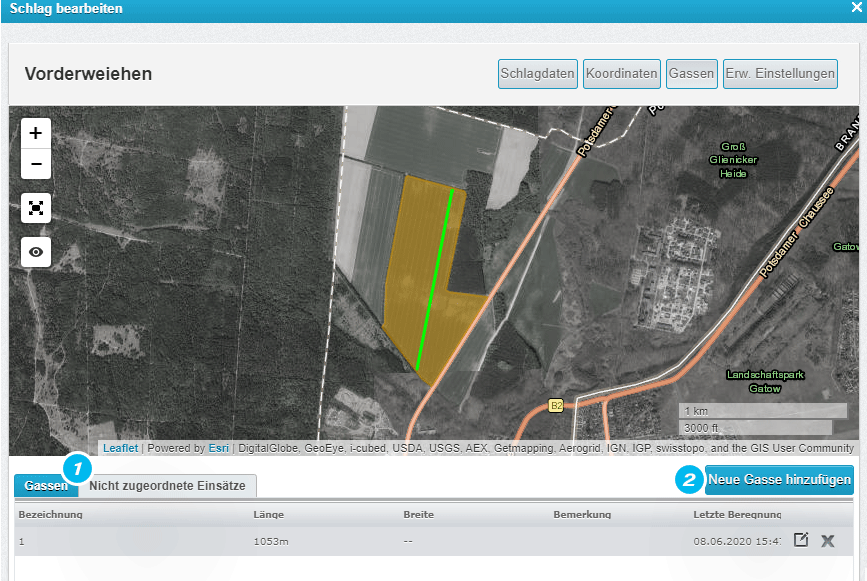
Select the field and go to edit  , then go to "Runs" [1]
In the table below the map, please go to " Unassigned operations" [2]
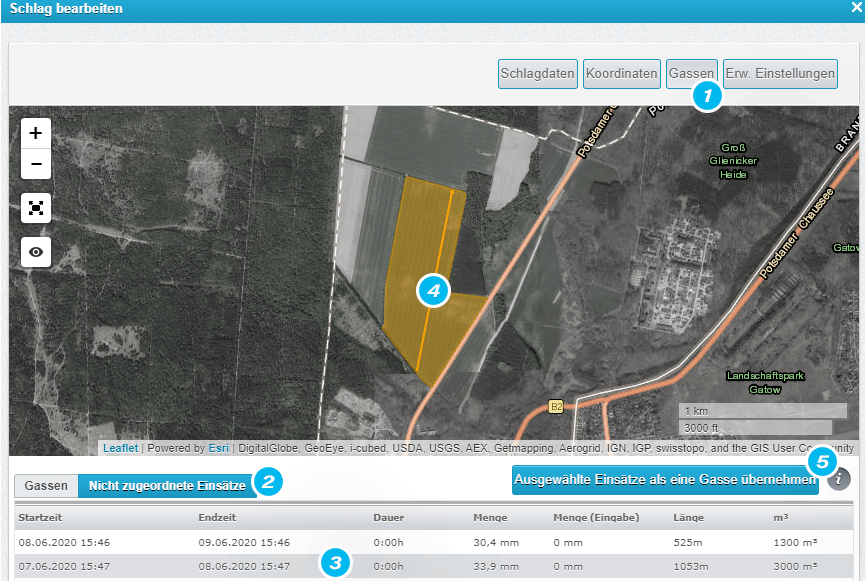
You can see all irrigation operations here.
Click on an run [3] to see it on the map. [4]
If you now click on the "Take selected missions assignments to a run" [5] tab at the bottom, an alley has been created.
Do the same with the other missions until you have created all the runs.
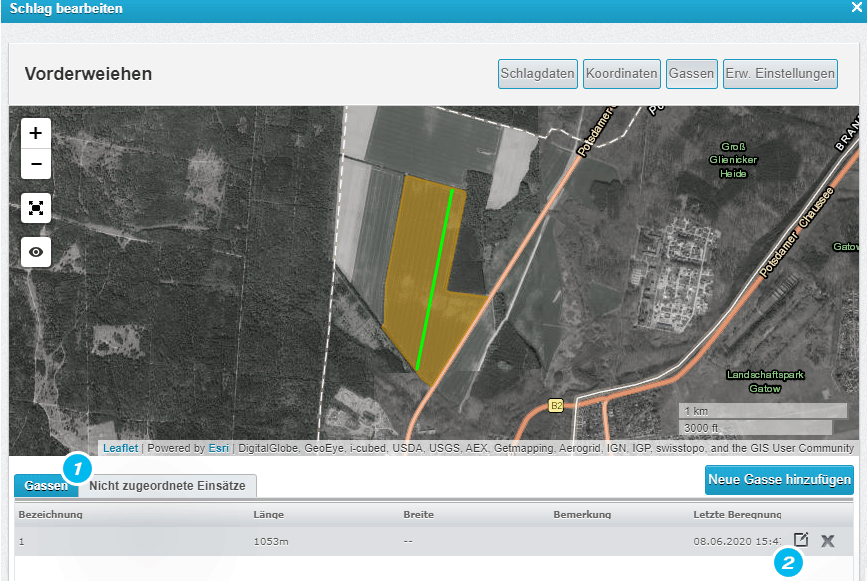
If you click on the "Runs" tab [1], you will see the transferred runs.
If you click on the Edit icon [2], you can change / add details for the run.
e.g. for irrigation in the headland width on the left side only 20 m.
Depending on the respective width, a semi-transparent area is displayed next to the run, which shows the working width,
to ensure a more precise marking of the run.
These two values (left and right width) are then used to visualise and calculate the irrigated amount.
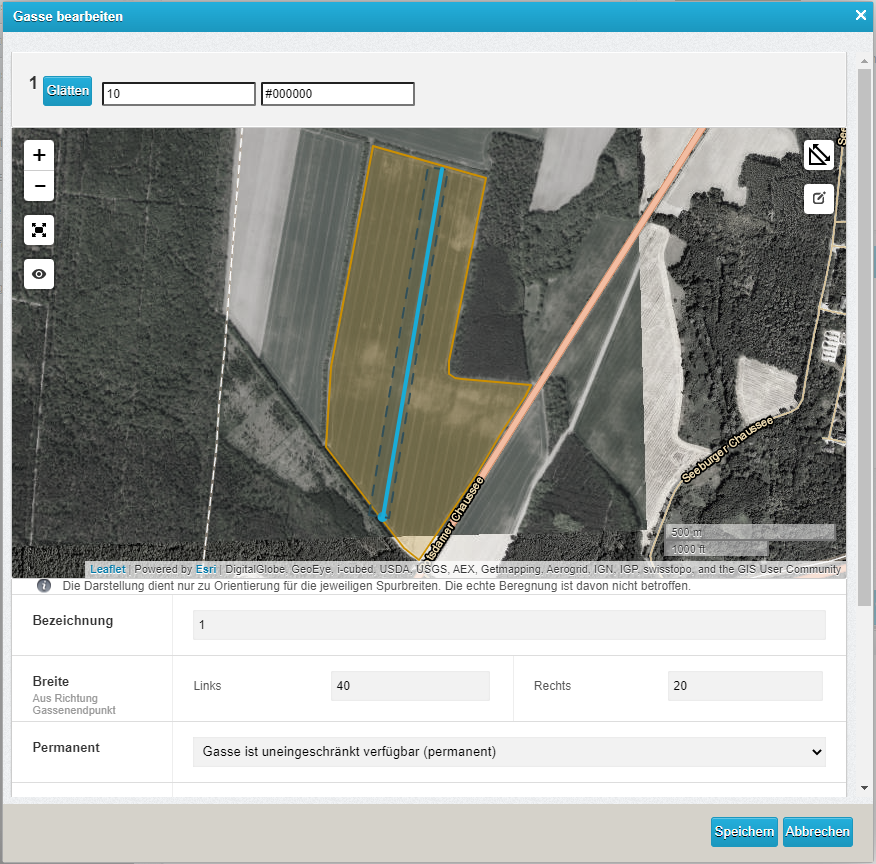
Left / right always with a view from the hose reel to the trolley!
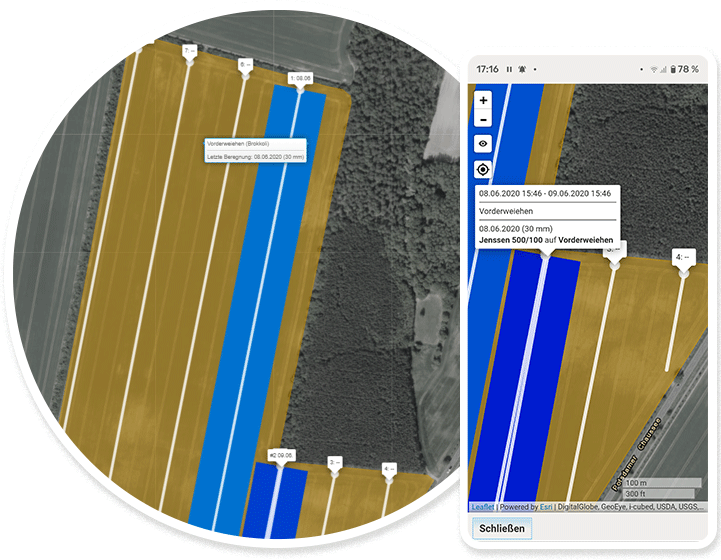
The runs are now permanently displayed on the fields with the information: when was the last time irrigation was carried out here.
Click on the alley to see the mm of the last irrigation and the total mm.
Of course also on the smartphone.
Draw a Run
- e.g. irrigation in the curve
A conventional hose reel can also irrigate in an arc, such as along the border of a field.
However, when using a hose reel that isn't self-propelled (unlike Fasterholt machines, which are), Raindancer will always plot a straight line from the starting point to the target. This typically isn't an issue, but with sector control, if the actual direction doesn't align with the start-to-target line, the stops could be miscalculated.
Therefore, it's advisable to manually draw these paths as runs.
You can now use the icon ![]() at the top right to define the run using several points.
at the top right to define the run using several points.
Click with the mouse on the symbol for Add new Run highlighted in yellow in the image below.
Now draw the run on the field with the software.
Start where your hose reel stands!
Complete the drawing of the Run by double-clicking on the last point you set for the Run.
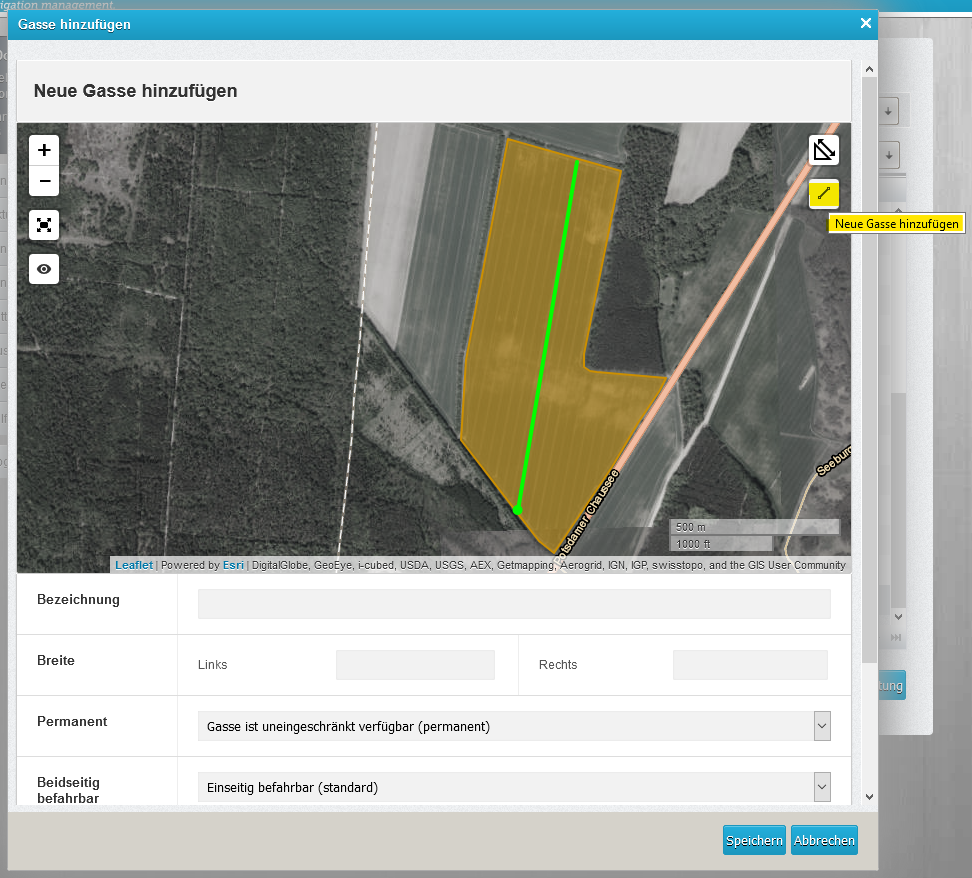
Give the run a name and add the width of the left and right sections of the respective Run.
If you wish, the Run can be deleted automatically after irrigation. To do this, change the settings in the Permanent field to "Run is available for one-time irrigation". Runs are always created "permanent" by default.
You have the option of changing the default setting "Permanent" to "Always once" in the advanced settings.
If you only want a specific irrigator type, such as a classic hose reel, to use a Run, select the relevant irrigator type from the list.
The irrigator that do not correspond to the irrigator type will ignore the Run. This prevents misunderstandings when automatically assigning Runs and irrigators.
If you wish, you can set whether a Run can be used on one or both sides. To do this, simply select the corresponding menu item under "Passable in either direction".
Permission for corner programmes allows you to set whether corner irrigation is allowed without having to change the setting on the irrigator.
You can find more information on the corner programme in the [irrigator control].
You can select Magnetic if you are sure that you have drawn the Run correctly.
This makes the sector on field boundaries more stable and does not constantly move back and forth two degrees, which saves the battery.
When the machine now irrigates on this Run, it knows the feed direction, length, etc.
If you are working with our sector control, the stop angles are calculated based on the current direction
When a machine initiates irrigation, it searches for the nearest "Run". This implies that it can execute runs on lanes that aren't identical to the real world - the Raindancer will find the Run regardless. Consequently, if two irrigation runs begin in proximity, both should be drawn to prevent the Raindancer from switching to an incorrect Run if it doesn't detect nearer one.
Deleting irrigation runs
- If you have not yet selected your field, proceed as follows:
- Select fields at the top centre
- To edit, click on the edit icon
 to the right of the field to be edited
- Select fields at the top centre
- Select Runs at the top right with a click
- Under the map under Runs listing, click on the icon
 to the right of the Run you want to be deleted
 - A pop-up window appears, asking you if you really want to delete this Run. You can confirm this by clicking on Yes.
- Click on the Save and close button at the bottom right to finalise the editing of the areas.


No Comments