Add Fields and Areas
Fields can only be drawn in the portal using a PC.
Tablets are only of limited use for editing fields and alleys.
Create a field
- Select "Fields" at the top centre
- To create a new field, click on the "Add" button at the bottom
- To edit, click on the edit icon
 to the right of the field to be edited
- To create a new field, click on the "Add" button at the bottom
- Assign a name
- Select standard well
- Select soil, "-" is preselected
- Select crop type
- OPTIONAL Select area
- OPTIONAL Assign a team
- Leave area empty, as the area is calculated by the drawn area
- OPTIONAL Select a Group, if desired
- Click on the "Save" button at the bottom right

Draw your Fields
- Click on the "Coordinates" button at the top
- Navigate on the map to the area you want to draw. To do this, you can reach into the map with the mouse and drag to the left and right. To zoom in and out, you can use the mouse wheel or the + or - symbol on the left-hand side of the map
- Click on the "New Shape"
 button (top right of the map) to activate the drawing mode for the field area
 - Drawing is done by placing points on the map
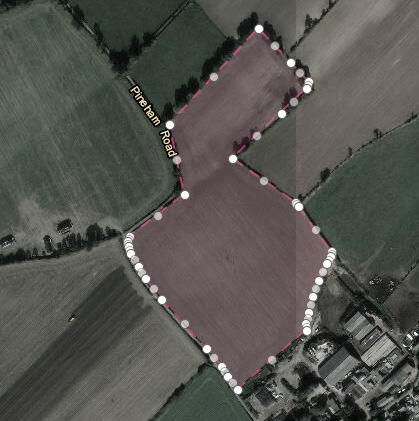
- Place the first point, preferably in a corner of your field, and place the remaining points one by one so that the boundaries of your field are mapped as accurately as possible.
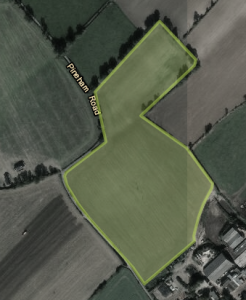
The last point should be placed on the first one to complete the field. - Click on the "Save" button to save this new surface. The colour of the drawn area should now be displayed in yellow on your map.
- If you have now finished editing the field, you can finalise this process by clicking on the "Save and close" button.

Edit your Fields
-
Click on the edit icon
 on the right-hand side of the map to activate the edit mode
 - The edges of the area are transformed into a line with many points. The white dots are the dots that you have previously drawn. Grey dots are ghost dots, which are only converted to real dot by clicking on them. The grey dots can be used to draw more precise areas.
- Drag these points according to your requirements to create the best possible representation of the surface.
- Click on the "Save" button to save this new surface.
- If you have now finished editing the field, you can finalise this process by clicking on the "Save and close" button.