The Sector Control
Thanks to various start programmes, conventional irrigation preparation is no longer necessary.
The angles automatically adapt to the shape of the field or existing obstacles and can be adjusted at any time. If the irrigation aisle is narrowed, the speed is adjusted accordingly.
You always retain full control, as a manual operating mode with app remote control is also available, which can be particularly useful in changing wind conditions.
- Install Sector Control correctly
- Initial start-up of the sector control
- Overhang
- Before irrigation - Checklist
- Manual Sector Control
- Transport the Sector Control
- Choosing The Perfect Angle
- The Effects of Wind
- Variable Rate Irrigation - Save Water
- Water Distribution with Sector Control at the Start and Finish
- Setup Sector Control with a boom on a Fasterholt
Install Sector Control correctly
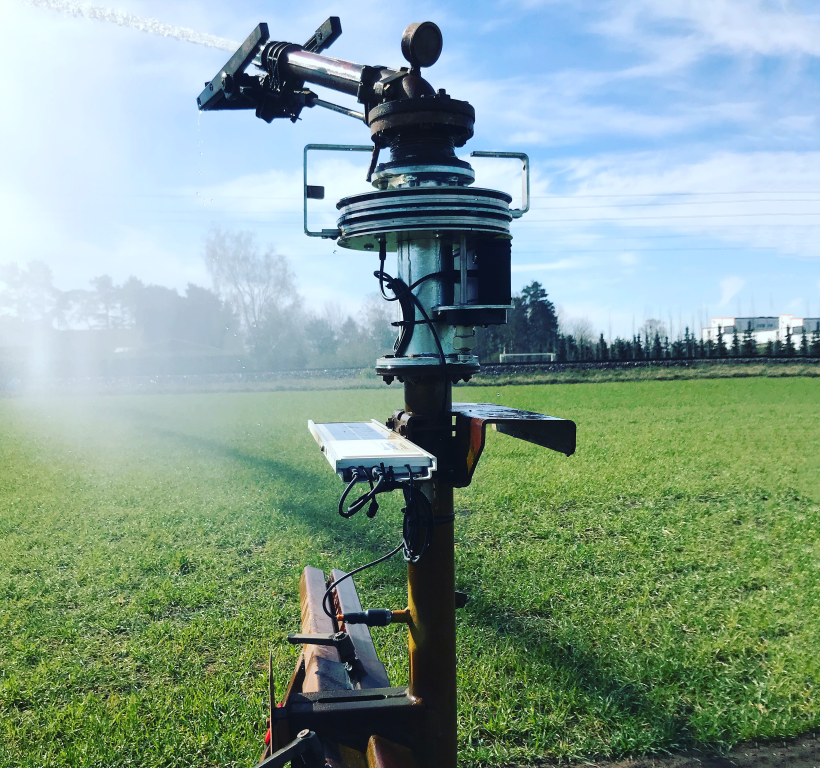 Mounting a Sector Control on a Irrigation Trolley.
What do I have to do?
- Remove the cannon.
- Remove the cannon stops.
- Place the seals between the flanges.
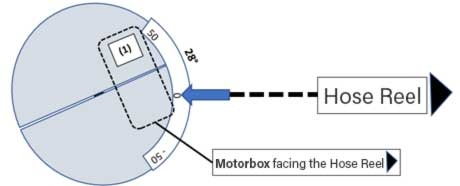
- Align the sector control so that the blue motor box faces the hose reel.

- Fasten the supplied screws.
- Mount the gun with the supplied gasket directly above the sector control.
-
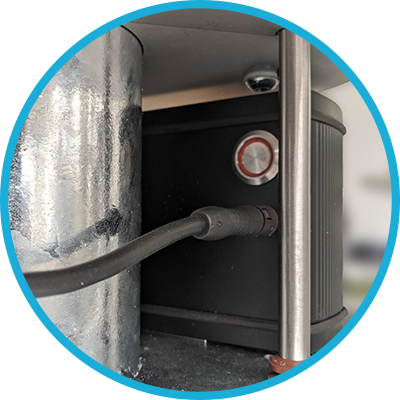
Now mount the provided stops which are fitting for your gun.
Screw the short stop always to the upper position from TOP, and the long stop to the lower position from BOTTOM. - Switch on the sector control on the black motor box. Make sure that the button is pushed in.

Alignment of the Stops
The tip of the triangular markings on the stops must ALWAYS point towards the gun lever.
|
Standard Setup |
Reverse Setup |
|---|


Initial start-up of the sector control
After mounting it is important to configure the sector control for the first time.
Read the Zero Position From the Sector Control

ero Position: Please hold (or stick) the included sticker with the angle indication in a way that the zero mark points towards the hose reel. Now you can read off the zero offset at the groove between the cover plates (here 28°). Please take care to note if + or – (+28° or -28° for example).
For irrigators with a lever located at the rear (e.g. Nelson), please add 180 degrees to this value.
Please enter the zero position offset into the app (see below).
Settings in the Raindancer App
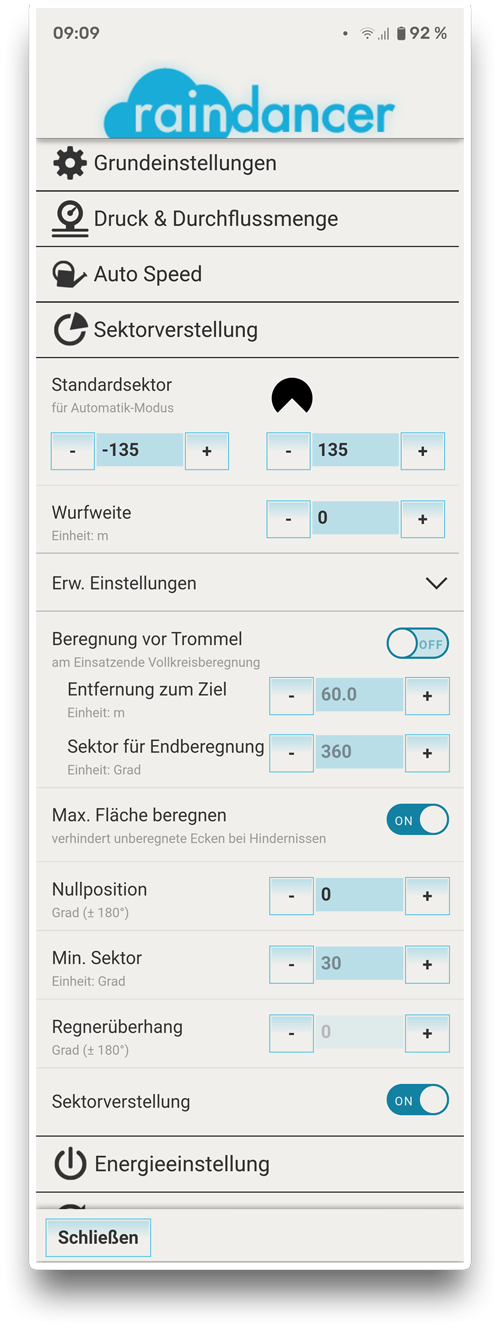
Click on the irrigator and go to the buttons "More" -> "Settings" -> "Sector Adjustment", here you must "activate" (ON) the Sector Adjustment.
With "Save and Apply Settings" your settings will be stored, and you will find more options in this section.
Now you can enter the basic settings.
Default sector: Here you enter the angle at which you wish to irrigate by default. (e.g. -135 / 135, if you water at an angle of 270°). The orientation of the schematic image is corresponding to the point of view that you have when you look from the hose reel towards the gun!
Please take care to note if + or –
Throwing Width: Raindancer uses the throwing range for calculating the correct angle of the stops.
Irrigation in Front of the Reel: For example, if you irrigate at 270°, you can set it to automatically switch to full-circle irrigation 60 m in front of the reel, to distribute water at this place as well.
Irrigate Max. Area: Should be set to "ON" - it will enable the Sector Control to irrigate into the corners in case of an obstacle.
Zero Position:
See above. Please take care to note if + or –
You enter this value only once after installation!
See further information for Overhang
Overhang
Click on the irrigator and go to the buttons More → Settings → Sector Adjustment → Ext. Settings
Measurement
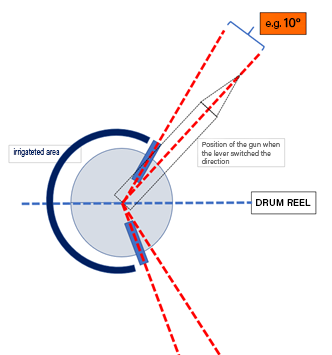
Sometimes the point to which the stop is set does not correspond exactly to the point at which the gun changes the direction of the pan.
To account for this variance, you can measure the gun overhang (see diagram) and then store it for the irrigator in the app.![]()
Before irrigation - Checklist
Before each irrigation, it is necessary to prepare the sector control to ensure trouble-free operation from the start.
A connection to the Raindancer is usually only made every 7 minutes!
The correction of the stops is therefore not done immediately.
Checklist
- Release the Clutch.
- Make sure that the arrows on the stops of the sector control point in the direction of the switch lever
- The switch lever must not be engaged.
- ❗Please ensure that the switch lever is stable enough not to jump over the stops.
- Adjust the left and right stops so that they do not water too close to the field boundaries
- Engage the Clutch.
- After a few minutes, the stops automatically adjust to the field edges.


Special case for guns with reverse switch levers.
The procedure is mostly identical. The direction of the stops is also in the direction of the switch lever. Make sure that the gun does not irrigate beyond the field borders in this setup as well.
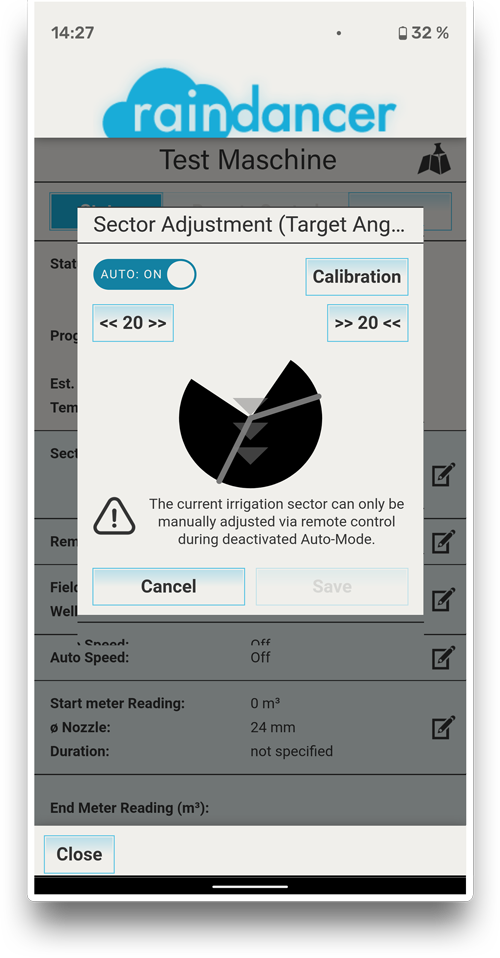
Manual Sector Control
Basically, you have two operating modes with the sector control:
-
AUTO:ON ⇾ You let Raindancer calculate and automatically set the stop angles
-
AUTO:OFF ⇾ You switch off the automatic system and set the stop angles yourself
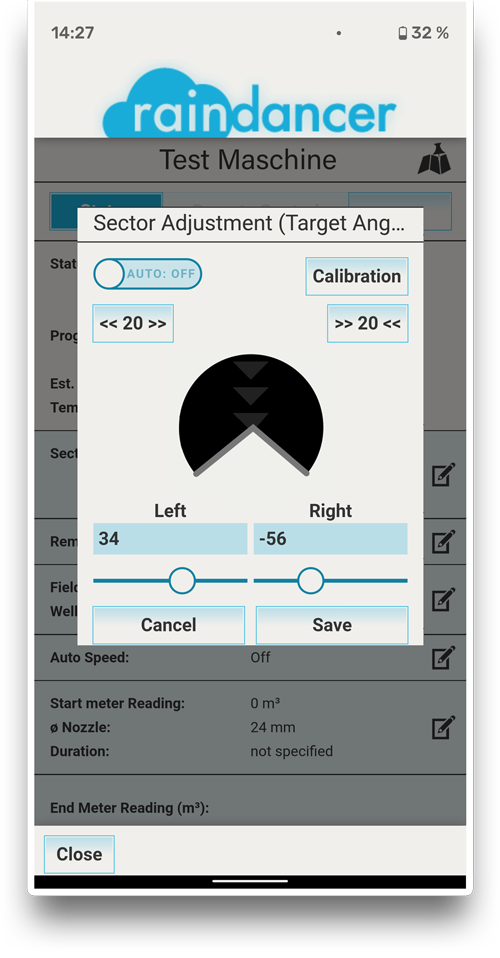
To set Auto:On/Off, go to the irrigator, then to the Sector Area.
Here you will find the "AUTO" switch for switching over.
You normally work in automatic mode (AUTO:ON).
The stops are calculated by the raindancer and set automatically.
Manual Adjustments
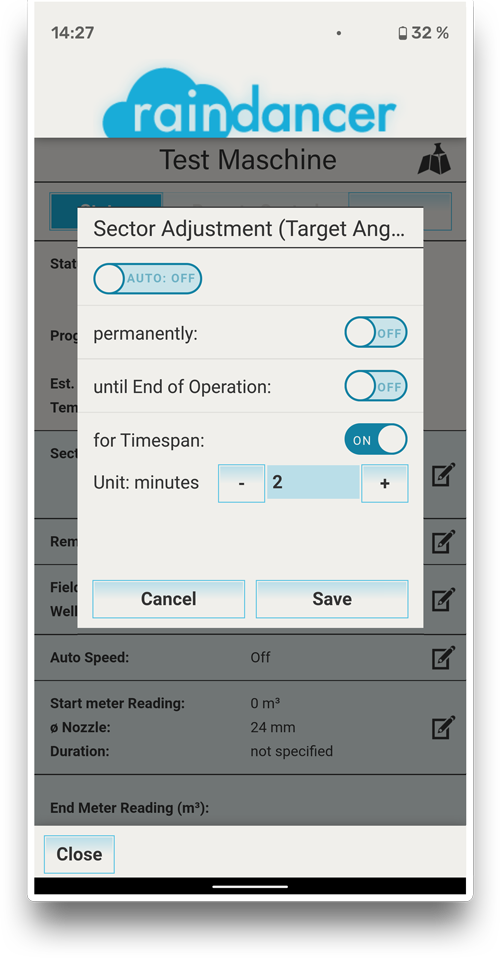
If you want to set the stop angles manually on the smartphone, switch to AUTO:OFF
You will now be asked whether you want to switch ...
- Permanently - i.e. until you later say yourself: now it should "automatically set the sector" again
- Until the end of the operation - i.e. only for this gear
- For a period of time (e.g. 120 min) - i.e. for a limited time, after which it will switch back to automatic sector control.
When could this be done?
e.g. if a stop is to be set to 50° for 2 hours when the wind is blowing in the evening.
The connection to the raindancer is usually only established every 7 minutes!
The correction of the stops is therefore not immediate.
Transport the Sector Control
For transport, you should fix the gun (e.g. with a rope) or fold up the stop on the gun.
Otherwise, the gun may hit the stops and bend them during transport
Alternatively, you can simply decouple the stops of the sector control.
Choosing The Perfect Angle
How do you actually set the stops on the gun to ensure the most even water distribution possible?
We therefore took the time in late summer to take some measurements.
The water distribution of an irrigation run naturally depends on the setting of the stops - we compared a full circle irrigation 360° or 180° with a 270° limit stop setting.
According to our analyses, the water distribution looks roughly as follows:

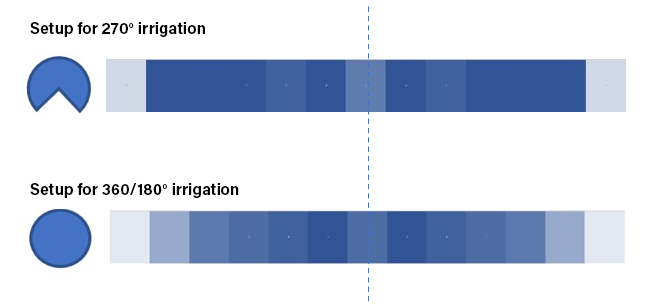
The 270° setting clearly allows more water to reach the outermost areas.
This does not really answer the question - which setting is "better"!
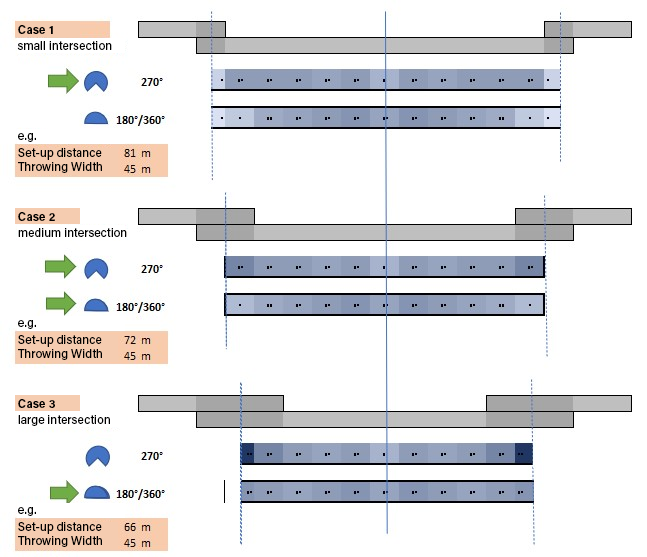
Intersection
Certainly, calculating water distribution must consider the "neighbouring runs," since the throw distance often exceeds half the working width. Consequently, with each operation, we irrigate a portion of the adjacent runs on both sides, which then "return this water" when they are irrigated.
When our water distributions for 360°/180° and 270° intersect at varying levels, it means that the settings of the stop angles are ultimately determined by the intersection area.
According to our measurements and our interpretation, this results in the following:
- If the area of intersection is small, it is useful to irrigate at 270° in order to get water into the outer areas (case 1)
- If we have a medium level of intersection, the two settings are quite similar (case 2)
- If there is a large intersection, irrigation should be done at 360°/180°, as otherwise too much water will be applied to the outer areas (case 3)
Clearly, these are our measurements and interpretations. To make scientifically sound statements, more comprehensive measurements and analyses would be necessary. Unfortunately, we do not have the time for such extensive research at this moment.
We can only report on what we have measured and our derived conclusions. Please take it with a grain of salt.
We would be delighted to hear your reactions, i.e. queries, criticisms, comments, additions and discussions!
The Effects of Wind
In connection with our sector control, one question that comes up frequently is: "What do I do in windy conditions?"
To provide a good answer, we began by taking measurements.
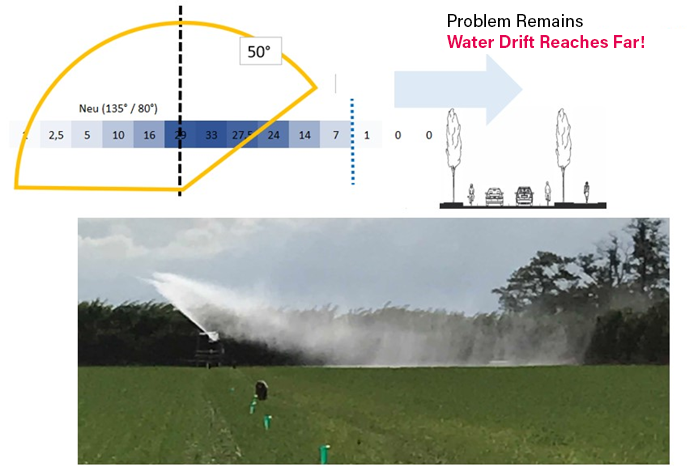
Side Wind
Situation:
The wind is blowing at sharp angles to the direction of travel, with a speed of approximately 25 km/h (Beaufort scale level 4). The values in the blue strips indicate the measured millimetres.
This is the reading for the measured wind drift:
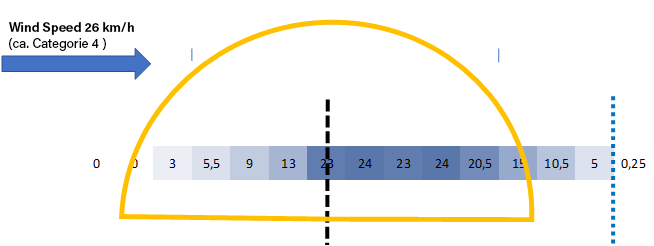
Almost no water makes it outside when it's windy. Even if the stops were adjusted to throw more water in that direction, it would make no difference (0 multiplied by 2 is still 0).
In the centre, however, instead of 23 mm, we would have significantly more.
Thus, there's nothing we can do against the wind.
On the side facing away from the wind, we irrigate approx. 10 m - 15 m outside the field boundary.
So we moved the stop on the opposite side to 50°. This is what the measurement results look like:

As already mentioned above: there is nothing you can do against the wind.
On the side facing away from the wind, it is possible to keep the water in the irrigation run - it is not irrigated onto the neighbouring run.
With Raindancer sector control, stops can be adjusted, for example, for four hours. The farmer must personally determine the time, angle, and duration of these adjustments.
Deciding whether to turn off the irrigation and restart it when the wind is weaker depends not only on water distribution but also on technological considerations: for instance, if I halt the irrigation for four hours, will I still be able to cover the fields with the available hose reels?
Therefore, if the drift crosses a road, problems are inevitable.
Start and End Program
Scenario: The wind is blowing from the field towards the field border,
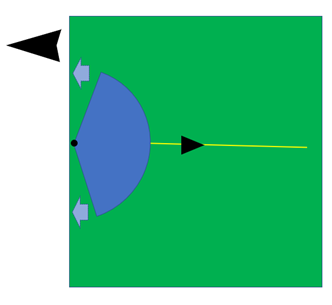
If the irrigation gun is at the beginning of its cycle, the Raindancer's throw range has little to no effect on the pivot point, causing potential drift outside the field boundary.
With Raindancer sector control:
Temporarily (e.g., for 10 minutes), the automatic sector control is switched off, and the stops are set as illustrated in the sketch.
The water will be directed towards the border, but it will not significantly cross the border.
Subsequently, you can resume using the Auto:ON mode with the throw distance as initially described.
Scenario: The wind blows onto the field.
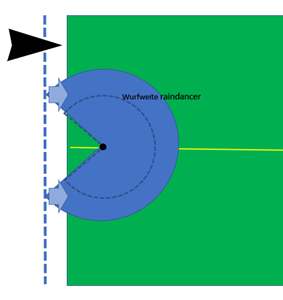 If you work with the real throwing distance, the turning point is where the water is pushed away from the border of the field and onto the field - the edge of the field itself does not get "anything".
With the raindancer sector control:
The throwing distance in the Raindancer is entered as smaller than the actual throwing distance.
The stop is thus adjusted automatically to allow turning later than "with no wind".
The water blows onto the field and water also arrives at the border of the field!
These are our (limited) measurements and our interpretations.
For scientifically based statements, far more extensive measurements and analyses are needed. However, we simply didn't have enough time for this.
We can only say here what we have measured and what our conclusions are. Please take this with a grain of salt.
Über Reaktionen, also Rückfragen, Kritiken, Anmerkungen, Ergänzungen und Diskussionen würden wir uns sehr freuen!
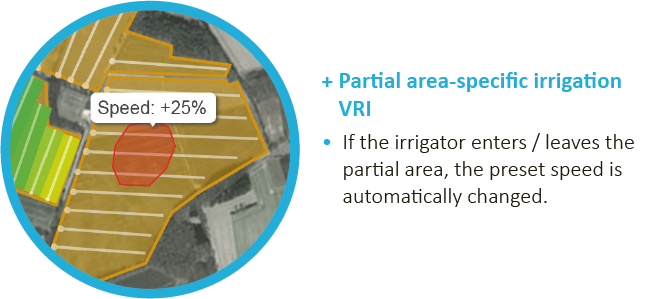
Variable Rate Irrigation - Save Water
We are all experiencing it painfully: water is becoming limited.
Increasingly, water has to be used economically when it comes to irrigation.
With varying soils in the field or dips, it can be useful to change the irrigation rate.
Raindancer makes it possible to realise area-specific irrigation.
You can draw these areas in raindancer and enter a change to the irrigation rate. If the irrigator enters/leaves this area, a corresponding IP/SMS command is sent to the hose reel.
Of course, this is only possible if your hose reel can be controlled remotely!
How it works with the raindancer
To be able to realise variable rate irrigation with the raindancer, your hose reel must of course be remotely controllable.
Within in Raindancer
Go to "Fields" in raindancer. Select the field via the "Edit field" icon on the right.
Then click on the "Coordinates" at the top.
You will now see the map of the field.
Use the "Create new shape" icon to outline the sub-area.
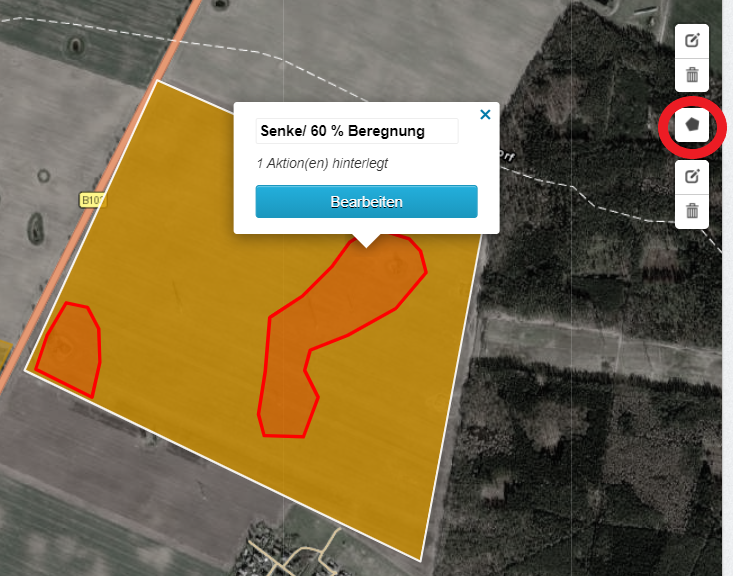
When the area is closed, you have the option of naming the event area (here: Sink / 60% irrigation) and editing it.
Click on "Edit" and then add a "New Action".
If you want to change the speed (and therefore the irrigation quantity), select :
Trigger Method: On entering
Action: Send command
Command: Change speed
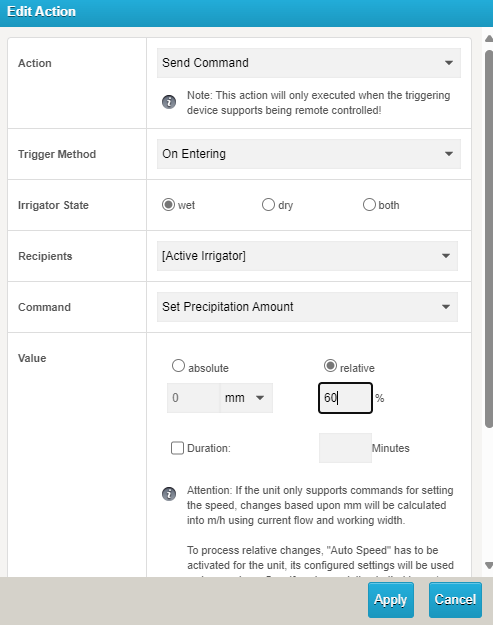 You can now select absolute (value in mm is specified) or relative - here in the example we have entered a relative change.
Example:
To reduce the irrigation rate by 40%, we choose the "relative" option.
This means that the area will receive only 60% of the previous irrigation rate, and this value (60) should be entered. If you wish to increase the irrigation (for example, by 40%), then you should enter 140%.
When the irrigator enters this area, a command is sent to the hose reel to adjust the speed.
Once the irrigator leaves the area, a command is automatically sent to the reel to revert to the original irrigation rate and speed.
We would be very glad to hear your reactions, questions, criticisms, comments, additions and discussions!
Water Distribution with Sector Control at the Start and Finish
If you work with the raindancer and sector control, you can irrigate right to the border at the start and finish.
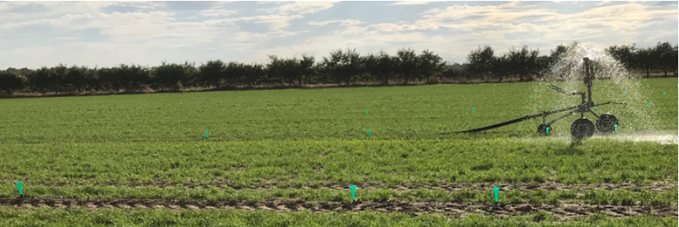
In this film you can see how it works in action ...
To see what the water distribution looks like in reality, we took measurements of the water distribution. We placed approx. 100 measuring cups in the area in order to obtain truly useful and interpretable measurement results.
This is what the results look like:
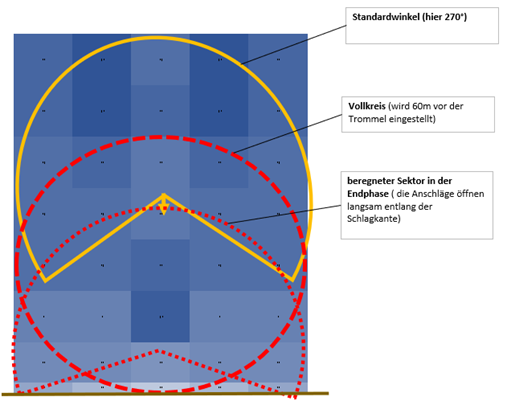
At the start, we compare the classic irrigation with 30 min pre-irrigation with the start using sector control. Here, the gun is positioned at the border of the field and the movement starts immediately.
The stops gradually close as it moves forwards. Once the full circle has been reached, the standard setting (270° in this case) is used to continue the run.
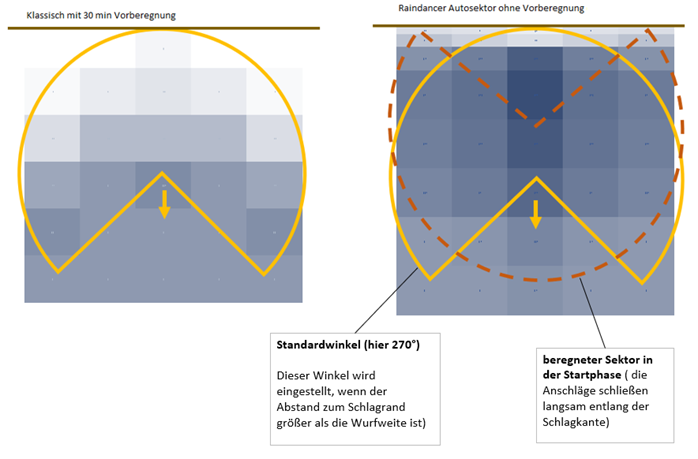
The measurement results show a significantly better distribution up to the boundaries of the field compared to the conventional method.
With conventional irrigation, approx. ¼ ha is not or barely irrigated (on average, only 25% of the planned precipitation is applied).
Let's assume, one application per day and an irrigation cycle of 8 days. This corresponds to a gain in irrigated area of approx. 2 ha per hose reel! Just at the start of the run.
We have also taken initial measurements for the water distribution at the end of the irrigation run - here are the results.
Basically, you have the option in the raindancer to set the irrigator with sector control to automatically switch to full-circle irrigation (e.g.) 60 m before the hose reel. This means that irrigation is also provided in front of; around and behind the hose reel. The full circle opens when the throw distance comes close to the edge of the field.
Effective water distribution is achieved here.
When the hose reel is positioned in the field before the headland, it continues to irrigate in a full circle up to the field's border. However, depending on the throw distance, there may be smaller, unirrigated areas left in the corners to the left and right.
At both the beginning and end of the irrigation run, you might notice smaller patches at the field's edge that receive insufficient water. In these instances, you can extend these areas beyond the field's boundary to ensure optimal irrigation right up to the field's edge.
How is this accomplished? By either reducing the throw distance or by marking an area outside the field and setting the status to "Allow irrigation."
Naturally, it is important to consider if there is a field path or a highway along the field's border.
Preliminary measurements for water distribution in self-propelled machines, such as in corners, have been conducted, but we are currently still evaluating. We will provide updates once we have conclusive results.
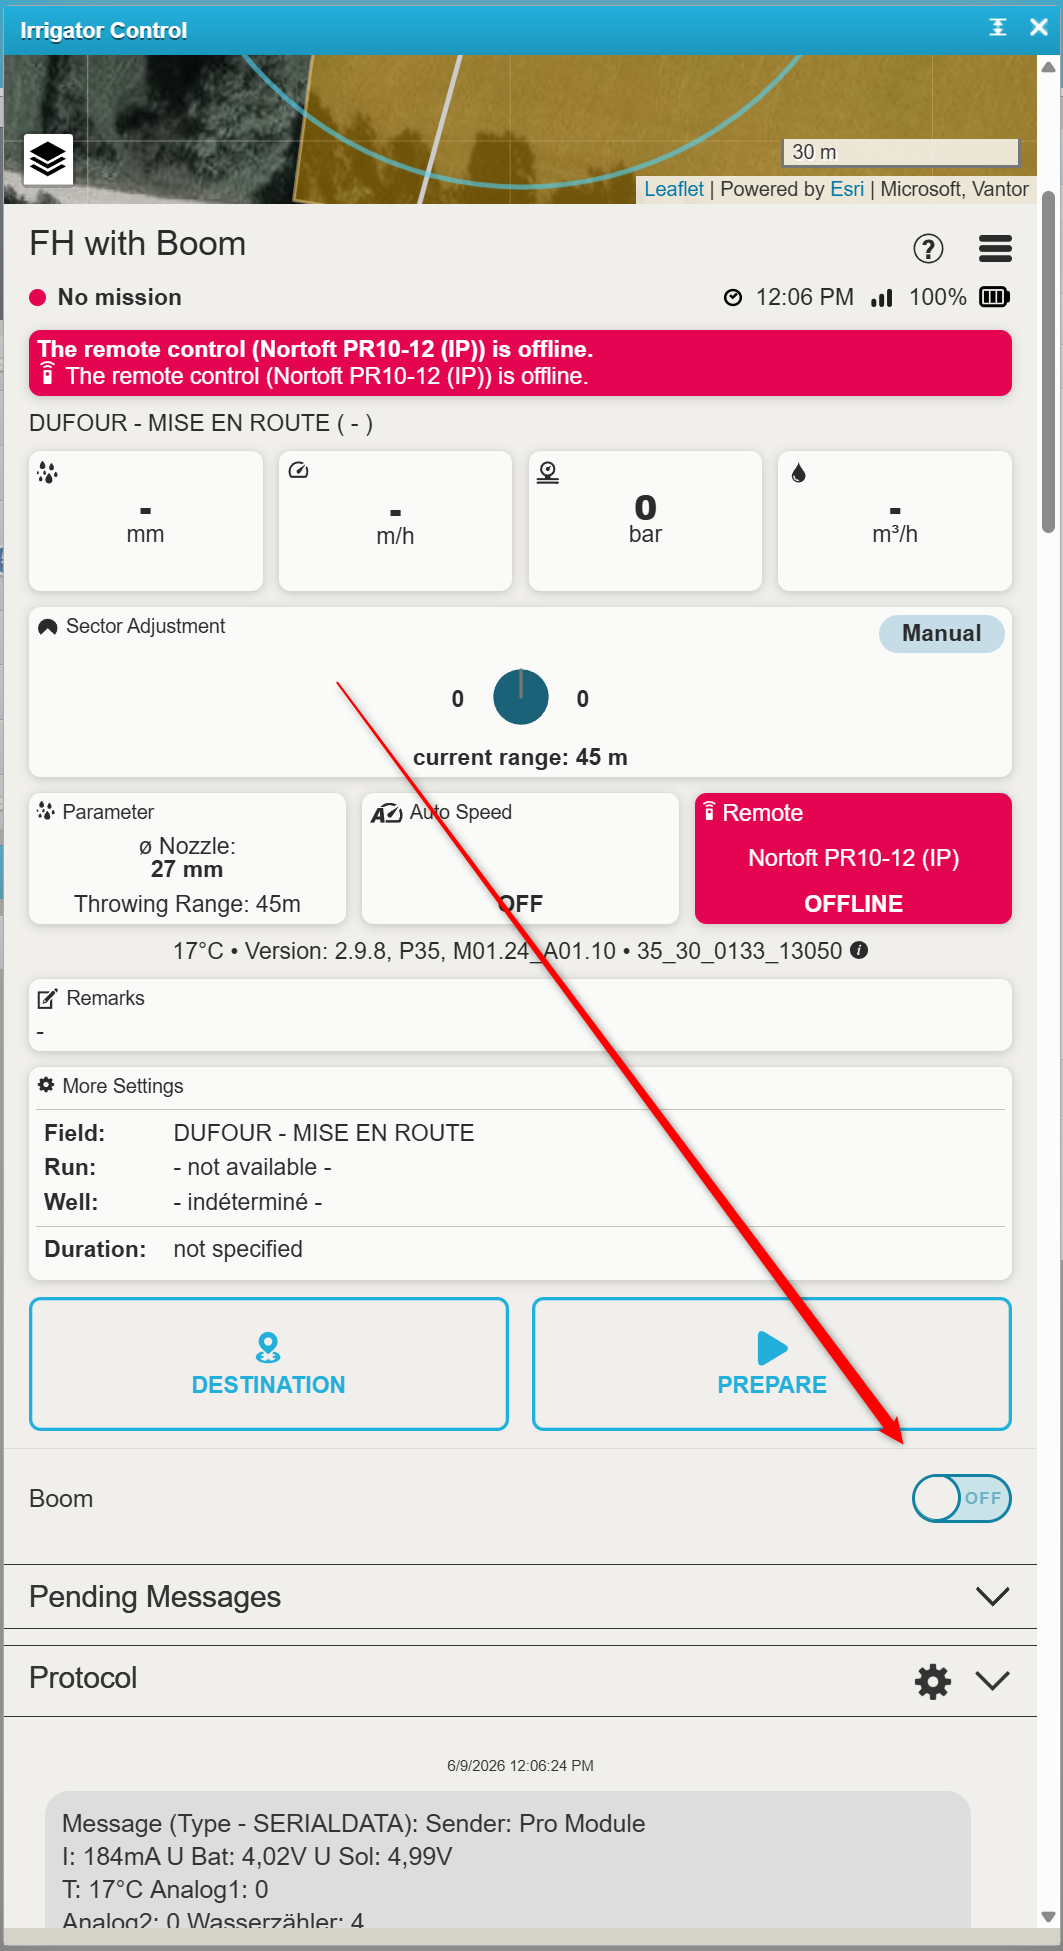
Setup Sector Control with a boom on a Fasterholt
To activate the Boomswitch in the Raindancer App, you need to go to extended settings and activate output channel two.
In default these settings are disabled. so you need to disable default checkbox and activate the features.
- has expansion ouput: active
- Output-Expansion Used Channels: Just output 2
- Output-Expansion Channel 2 Label: Boom (or similar (just the label)
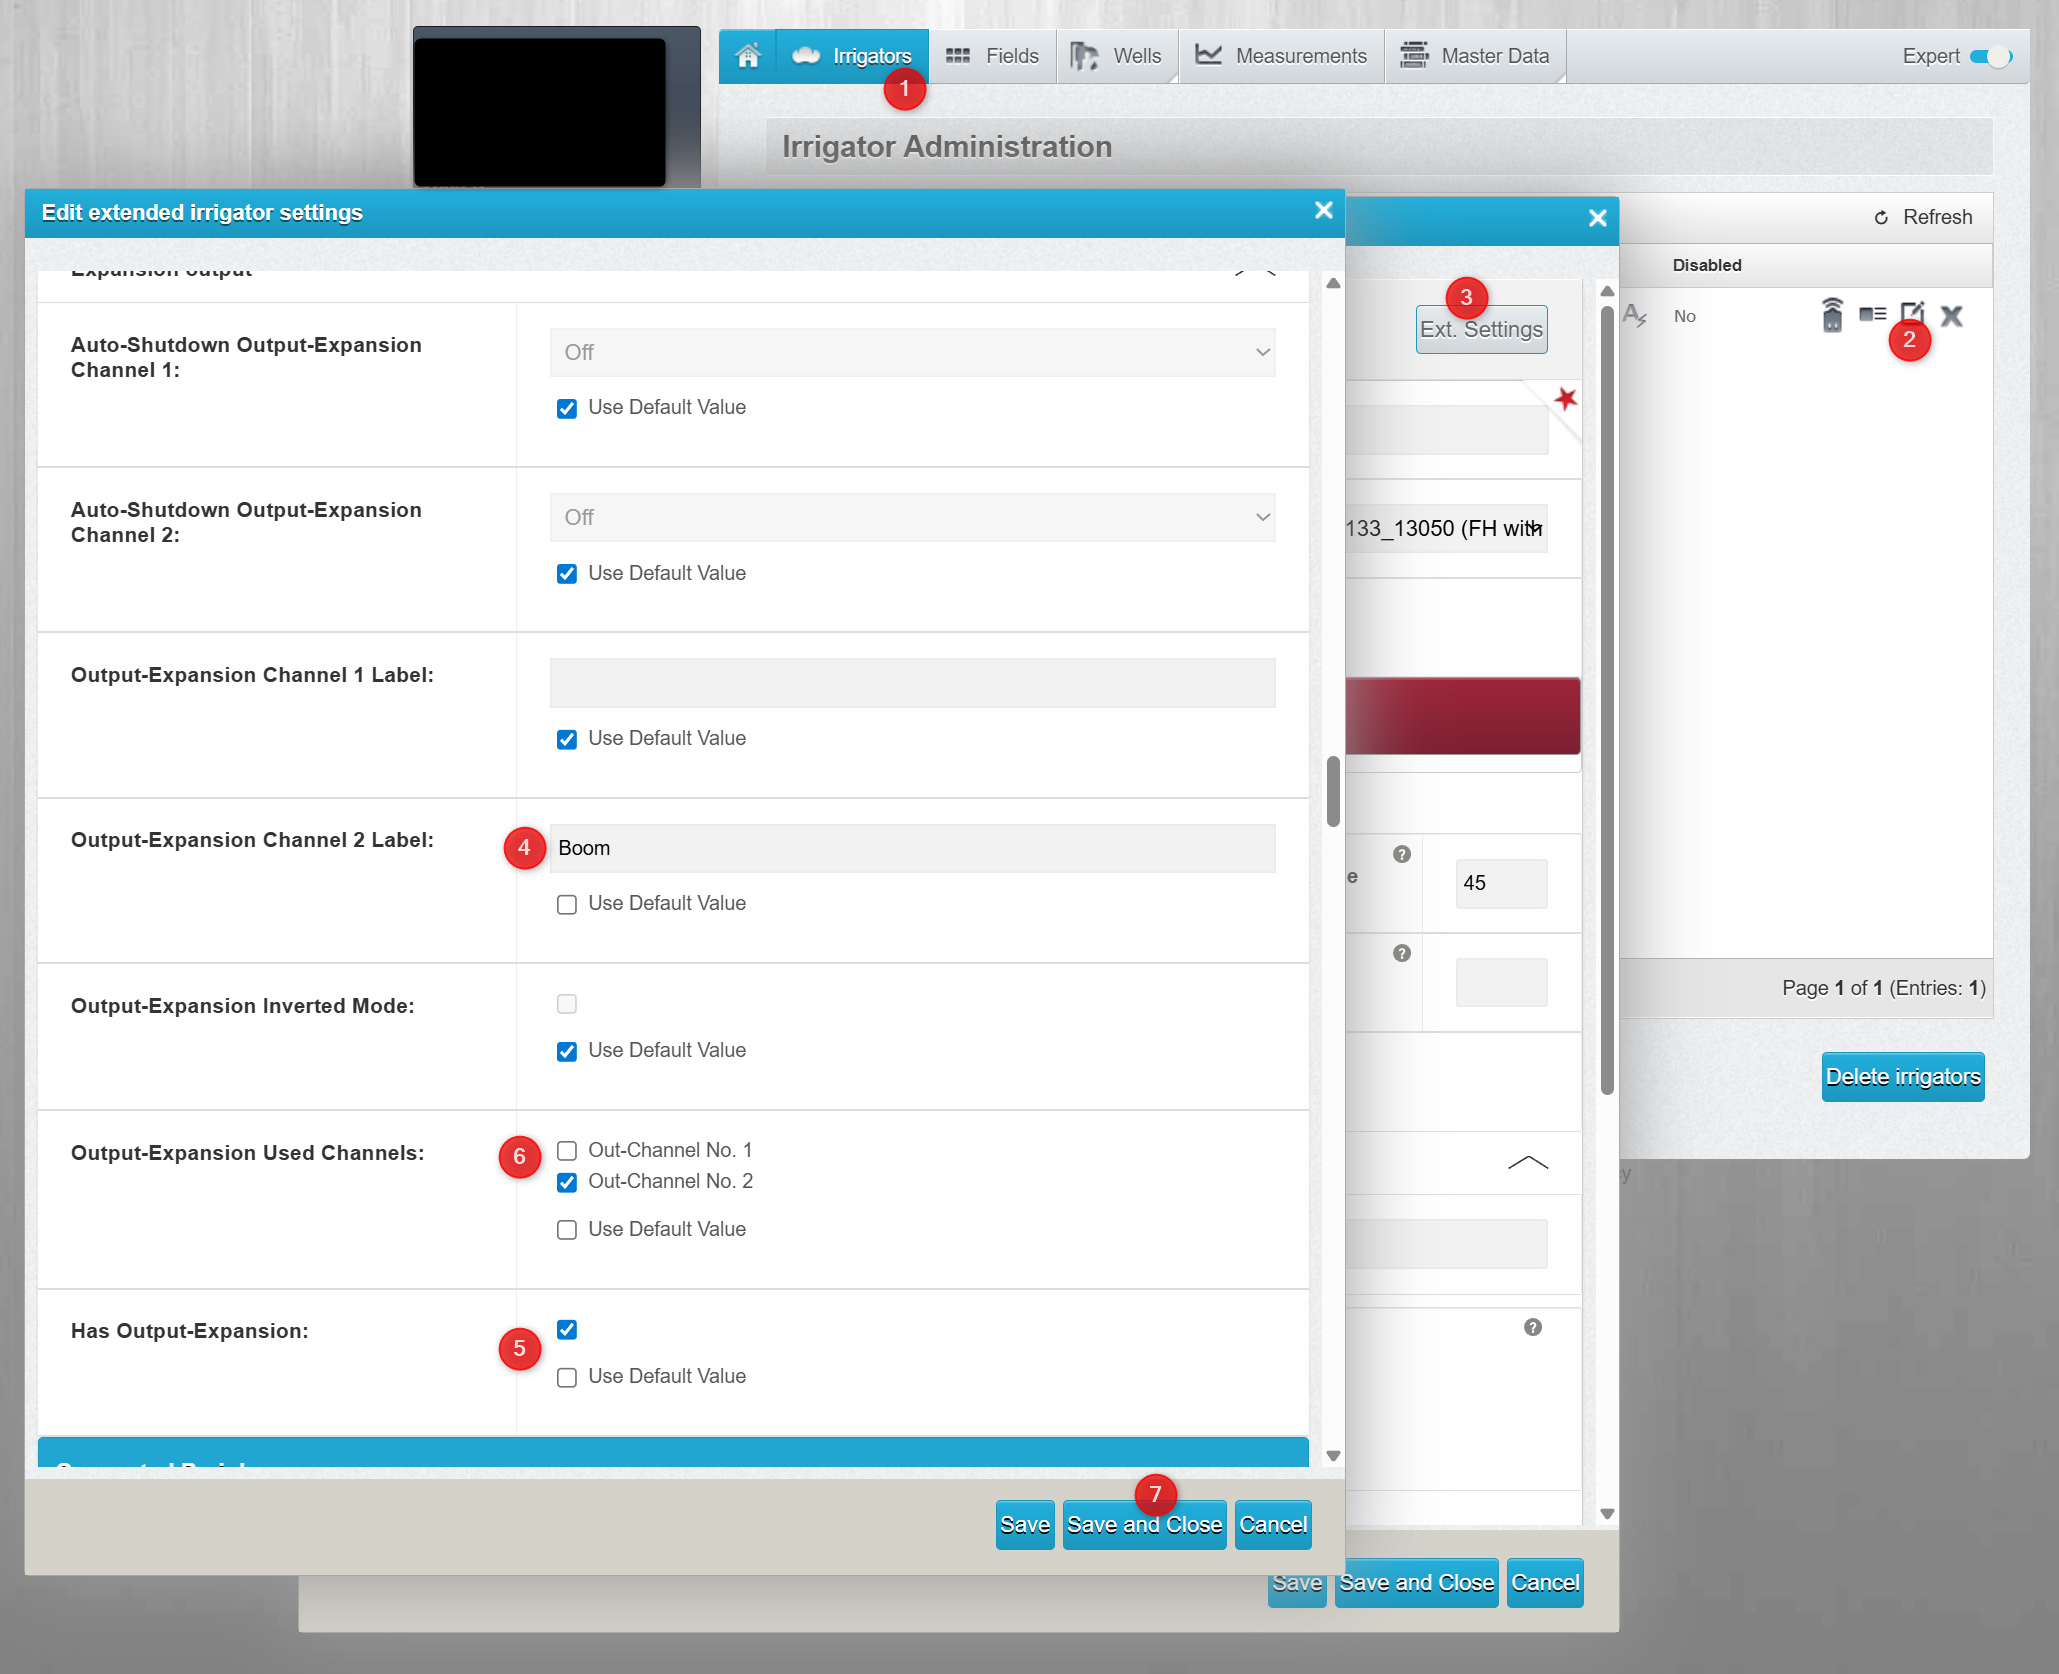
After activating the inpunt, the Output switch will be visible in control mask.