Settings and Configurations
This section is constantly being updated and expanded to provide as many answers as possible to common questions and useful information.
If you have not found what you were looking for in this section, please let us know which topic you were missing and we will add your suggestions to our knowledge database.
Für Feedback oder Anregungen treten Sie gern mit uns in Kontakt unter www.raindancer.com/kontakt
- Create Users and Manage Rights
- Setup Notifications
- Create a Well
- Add Fields and Areas
- Field Import
- Event areas - Getting started
- Event Areas and their Actions
- Create a Run
- Auto Speed - The cruise control for irrigation
- The Master Data - Crops and Soils
- Plan Future Operations
- Units - Metric or Imperial
- Irrigatior Control - Remote control of irrigation
Create Users and Manage Rights
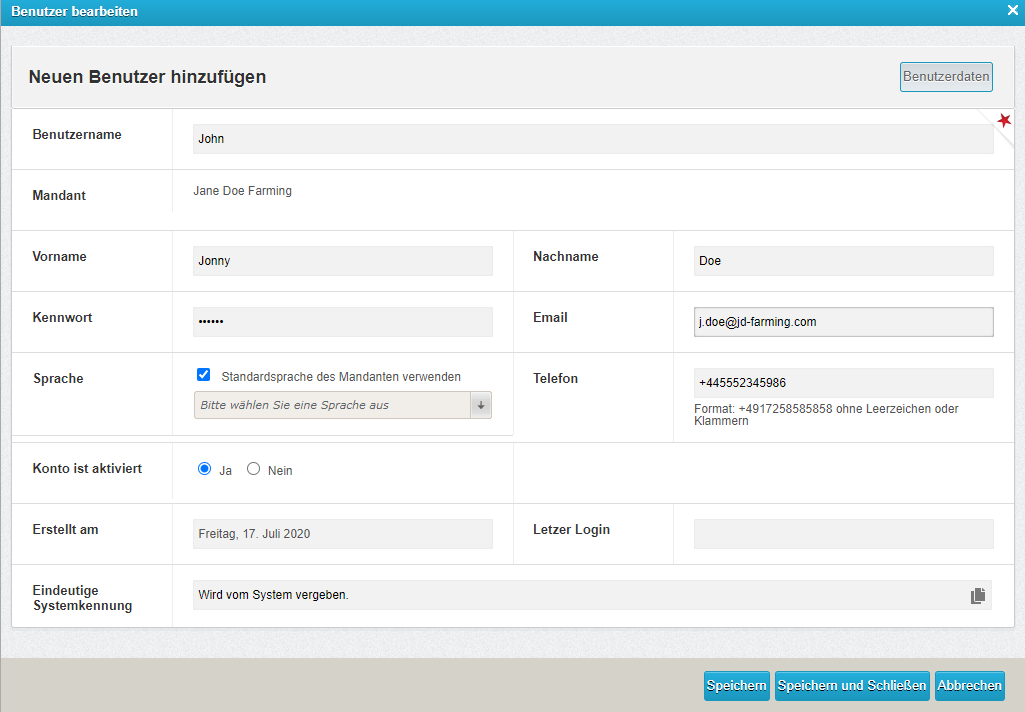
In the Raindancer portal, select Config on the left-hand side, then User
You should now be in the user overview. Here you should find the "Administrator" and a "Service" user
(and possibly a "Support-*" user)
The "Service" and "Support" user allows the Raindancer support team and your dealer to access your application to help you with your questions. If you do not want this, you can deactivate or delete the service user, but you will lose the opportunity to be quickly supported by us.
(English Subtitle available)
How to Set Up a New User:
- Click on the "New user" button

- Enter an Username, i.e. Firstname.Lastname
- Set Firstname and Lastname. This is important for the notifications page.
- Set a password (The password will show as empty when you save the user or call up the user again)
- With setting the email address and phonenumber fields you let us know how you would like to receive notifications from the raindancer system.
- Setting an email address has also the advantage that the user can reset their password if they need to.
- Select the notification method for this user. SMS or WhatsApp
Entering the telephone number will cause you to receive notifications (for a fee) via the specified channel
- Setting an email address has also the advantage that the user can reset their password if they need to.
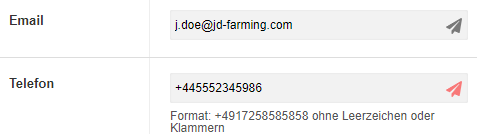
- You can click on the
 Symbol next to the e-mail address or phone number to test the communication with raindancer.

A pop-up window will appear to notify you that a test message will be sent. Click on "Yes" to send the test message. - You can pre-select a different language for the user under "Language".
- Click the "Save" button to apply these settings.
Setting Up Push-Notifications ANDROID
Setting Up Push-Notifications IOS
Permissions (Memberships)
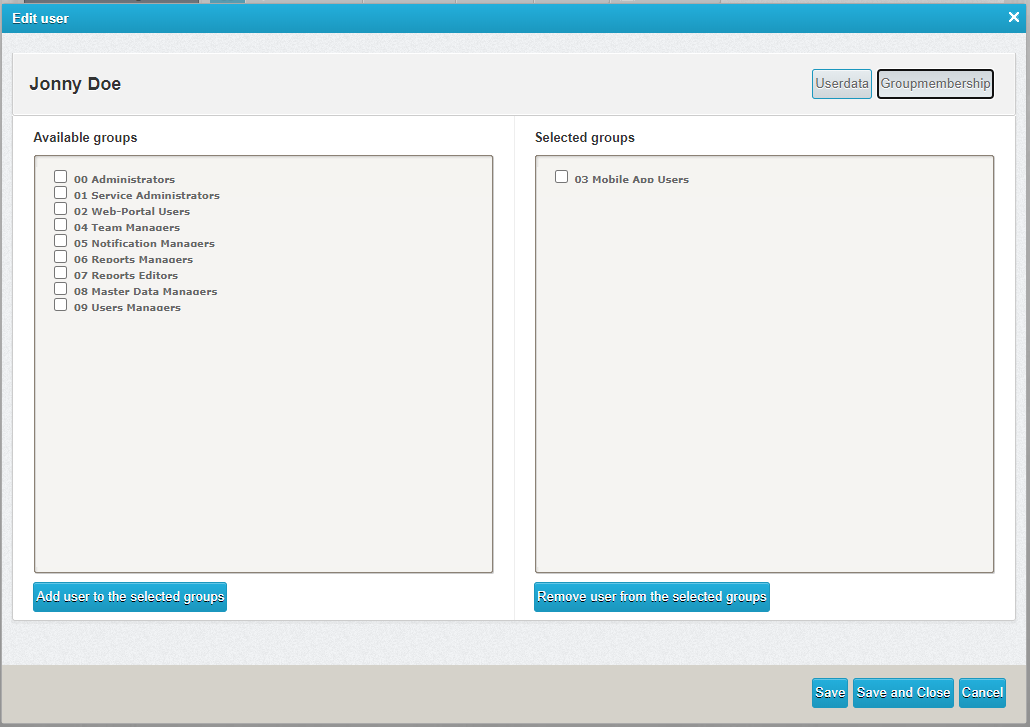
We have now created a new user.
To allow the user to use the app or access the raindancer portal, we have to grant him/her the correct rights/permissions.
-
- At the top right position, select "Groupmembership"
- You should see two columns.
On the left you have the available groups which you can assign to the user.
On the right side you see already assigned groups. - To assign a group to the user, tick the box next to the group that you want to assign to the user and click the "Add user to the selected groups" button.
The selected groups should have moved over to the "Selected Groups" column.
Click on the "Save and Close" button to complete the user setup. - Optionally, you can select which notifications your users should receive. Further information can be found here: Notifications
- At the top right position, select "Groupmembership"
Membership Groups
A brief explanation about the available membership groups:
| NR | NAME | EXPLANATION |
| 00 |
Administratoren |
Full access on your system |
| 02 | Web-Portal Users |
User can log on to the raindancer portal but cannot amend any settings. |
| 03 | Mobile App Users | User can use the App. |
| 04 | Team Managers | Responsible for the optional teams module and assembles teams |
| 05 | Notification Managers | Can adjust / set notifications |
| 07 | Reports Editors | Can edit / rebook completed assignments (May also edit the water quantities later) |
| 08 | Master Data Managers | Can manage crops and soils |
| 09 | Users Managers | Can manage users and corresponding settings |
Setup Notifications
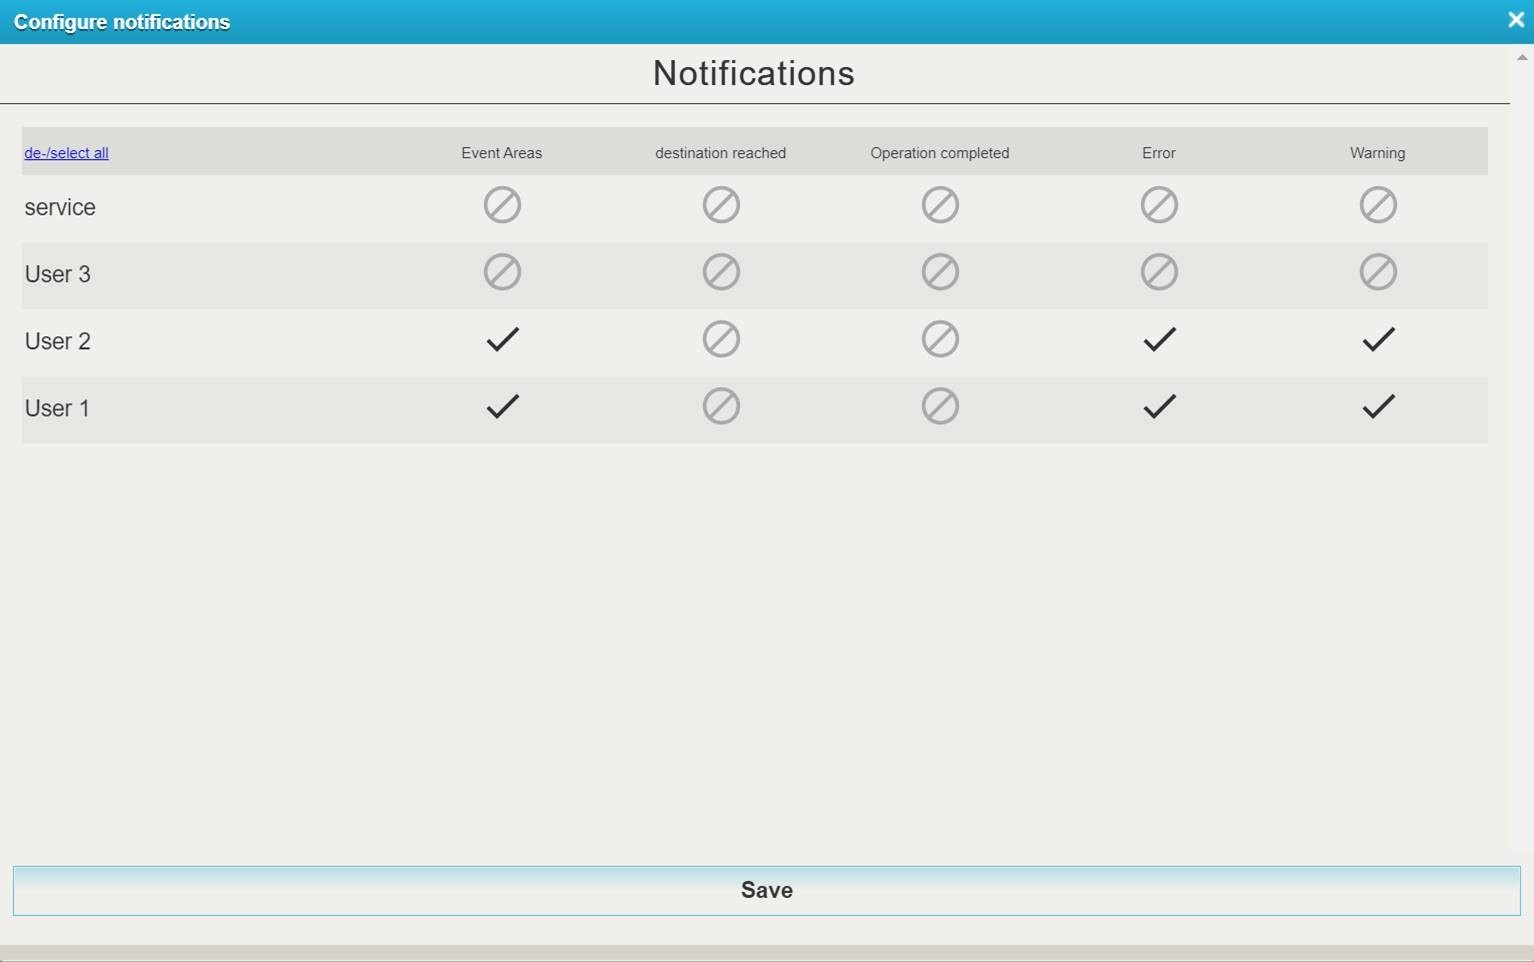
To have employees notified, follow these steps.
How to set notifications
- On the raindancer portal, select Config on the left-hand side, then User
- Click on the Configure Notifications button at the bottom of the user overview
- Tick the box next to the employee
 , to indicate that the selected employee will receive a notification for these events.
  Icons, on the other hand, deactivate these notifications. Clicking on the icons changes the mode.

You also have this option in the Raindancer app. To do this, click on more in the lower menu bar and select Notification Settings.
Explanation of the Events:
- Event Areas:
Event areas are zones that have been drawn by you within your field to, amongst other things it can trigger a notification when the raindancer enters or leaves this zone. - Destination reached:
A notification will be sent shortly before the irrigation run is completed.
The standard setting is set to 25 meters before the target point / hose reel. This value can be adjusted in the settings. - Operation Completed:
The irrigator has reached the target radius and a drop in pressure is detected. - Error:
This kind of events require immediate intervention. Examples of a malfunction could be a tipped over gun carriage or a too high water pressure. - Warning:
Warning messages are notifications that interfere with, but do not catastrophically hinder, operation. An example of a warning message would be a low pressure value at the sprinkler.
Create a Well
The term well refers to all water sources that are used for irrigation.
Managing one or more wells is particularly useful if you need to keep track of the quantities of water withdrawn.
What do I need to do?
- In the raindancer portal at the top click on Wells → Wells
- Click on the "New Well" button
- Assign a Name
- Set latitude/longitude.
Note: If you are using the map to set latitude/longitude,
please do not close the window with the x-symbol, as this would close the complete
setup for create/edit the well and all your entries will be lost. - Select the volume or operating time for billing type
- OPTIONAL Select a team if this option has been purchased
- Click on "Save".
Detailed Information on the Inputs
Name
Enter the name for the well here.
Latitude / Longitude
Specify where the well is located. You can enter the coordinates manually. Otherwise, you can also use the map tool, which you can access by clicking on the "Map" button.
Accounting type
Here you specify the billing type for the well. You can choose between cubic metres (m³) and hours (h).
Accounting identifier
Here you can give the well its own identifier apart from the name. This has the advantage that you have several wells with the same identifier and can later filter by exactly this identifier.
Permitted Quantity
Enter the maximum quantity that may be withdrawn from the well here. You will then see how much water has been taken and the maximum amount that may be withdrawn.
Remarks
Here you can leave important information for colleagues / employees.
Teams
Here you specify which teams have access to the well and which do not.
Add Fields and Areas
Fields can only be drawn in the portal using a PC.
Tablets are only of limited use for editing fields and alleys.
Create a field
- Select "Fields" at the top centre
- To create a new field, click on the "Add" button at the bottom
- To edit, click on the edit icon
 to the right of the field to be edited
- To create a new field, click on the "Add" button at the bottom
- Assign a name
- Select standard well
- Select soil, "-" is preselected
- Select crop type
- OPTIONAL Select area
- OPTIONAL Assign a team
- Leave area empty, as the area is calculated by the drawn area
- OPTIONAL Select a Group, if desired
- Click on the "Save" button at the bottom right

Draw your Fields
- Click on the "Coordinates" button at the top

- Navigate on the map to the area you want to draw. To do this, you can reach into the map with the mouse and drag to the left and right. To zoom in and out, you can use the mouse wheel or the + or - symbol on the left-hand side of the map
- Click on the "New Shape"
 button (top right of the map) to activate the drawing mode for the field area
 - Drawing is done by placing points on the map
- Place the first point, preferably in a corner of your field, and place the remaining points one by one so that the boundaries of your field are mapped as accurately as possible.
The last point should be placed on the first one to complete the field. - Click on the "Save" button to save this new surface. The colour of the drawn area should now be displayed in yellow on your map.
- If you have now finished editing the field, you can finalise this process by clicking on the "Save and close" button.

Edit your Fields
-
Click on the edit icon
 on the right-hand side of the map to activate the edit mode
 - The edges of the area are transformed into a line with many points. The white dots are the dots that you have previously drawn. Grey dots are ghost dots, which are only converted to real dot by clicking on them. The grey dots can be used to draw more precise areas.
- Drag these points according to your requirements to create the best possible representation of the surface.
- Click on the "Save" button to save this new surface.
- If you have now finished editing the field, you can finalise this process by clicking on the "Save and close" button.

Field Import
These guide will help you to import your field data from the various sources.
Click on Fields → Import to start the Import process.
Select Your Source
In the Select import type field, select the type of your source files.
You have the following options available
- kml/kmz - This format is used in Google Earth
- shp (Shape) - Many GIS systems support this format
- shp as ANDI - This data format is reserved for farmers in Lower Saxony
Make your decision based on your source material.
Upload Data
Follow the instructions in the system to select the correct files in order to import them without errors.
shp - Shape
If you want to import a shapefile, you must select at least one shp, one shx and one dbf file.
A prj file, which defines the projection in which a shape file exists, should also be selected.
If this is not used, the projection must be selected manually in the next step
shp from Andi
In addition to the files described here under shp, an xml file must also be selected. A prj file is not necessary, as all Andi files are available in the same projection.
Once you have selected the files, click on "Check format". This will transfer the files to the server and further options will be displayed.
For ANDI files, Raindancer usually sets the values of the selection boxes automatically to match the required data.
Projection
If Raindancer cannot determine the projection, you can make a manual selection here.
This should only be the case for shp files without a prj file.
Group
Raindancer is capable of managing multiple field groups. You have the option to input free text to define a new group or choose from the existing groups. To update existing fields with data from the import file, it is required that the field in the database and the fields in the file belong to the same group. If they do not, an assignment cannot be created, and the field from the file will be added as needed.
Filed identifier
The field identifier defines the property by which a field from the file is assigned to a field in the database.
If you select "Do not use import identifier", all fields in the file are considered new fields and no assignment is made.
This can lead to overlapping. This can lead to unpredictable behaviour. Make sure that the fields are not exactly "on top of each other".
The preferred option is "Use geographic area for mapping".
This option enables Raindancer to compare the geographical position of the field in the file against that in the database. If there is sufficient overlap between both fields, an assignment is made. The new field must match at least 90% of the old field - if this criterion is met by multiple fields, the one with the smallest area outside the intersection is chosen.
All other options are associated with a data column in the field file.
Field Identifier and Field Number
All the data columns from the file are displayed. The values from the selected column are utilized as the field identifier or the field number.
Field Name
All the data columns from the file are displayed. The values from the selected column are used as the field names.
The select boxes each give you an example of the data contained in the column Look carefully for your desired data.
Area Calculation
Select the area calculation method that suits you best.
For your first import, it is advantageous if you have the area calculated using the geodata.
The appropriate option for doing this is calculate area if no area is available yet
Crops
Here, you can select a file column from which the crop type is to be obtained. For each value in this column, a new crop type is created in the system if it does not already exist and assigned to the corresponding field.
Update existing field properties
- Crops
- Number
- Name
of assigned fields in the database is updated.
Update Existing Field Coordinates
The geography of an assigned field in the database is only updated if this option is set.
Deactivate fields that are not present in the import
If the fields have been assigned by geographic position, all fields in the client that are not present in the field file are deactivated.
Do not add new fields from import and only include existing fields
No new fields are created, only updates to existing fields in the database.
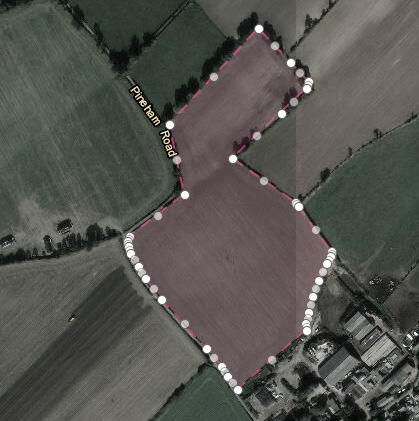
Event areas - Getting started
You can draw event areas on your fields to trigger actions there.
When the irrigator (the trolley) "enters" and/or "leaves" these areas, the following actions, among others, can be triggered:
- A notification is sent to employees / free phone numbers
(e.g. information that the angles need to be set differently / precursor to sector control). - Change the precipitation/speed (variable rate irrigation)
e.g. for clay banks, dips etc. (prerequisite is remote control of the reel) - Stop the irrigation
For irrigators that run with our sector controls, settings can be stored for the marked areas, e.g:
- Allow irrigation (e.g. for irrigation beyond the field boundary)
- Prohibit irrigation (e.g. to maintain a safe distance from the road)
- Adjusting the stop angle for an area
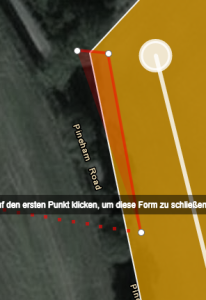
Draw in event areas
Event areas are marked in red.
- Click on the "New shape" button (top right of the map) to activate the drawing mode for the impact area
- Drawing is done by placing points on the map
- Set the first point and set the remaining points one after the other so that you map the event area as closely as possible.
The last point should be placed on the first one to complete the drawn area. -

Setting marker points

Finished event area
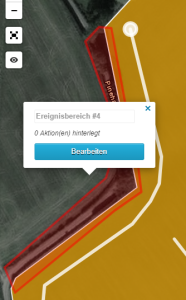
- After you have drawn the event area, please click on the "Edit" button
- Click on the "Add New Action" button here

Here are some examples:
-
Send a message to an employee when reaching or leaving a marked area
-
If you select "Send command" here, for example, you can, among other things :
-
Stop the irrigation
-
Change the irrigation quantity
-
Change the sector
-
Preventing/allowing irrigation
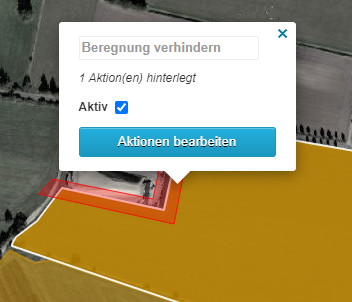
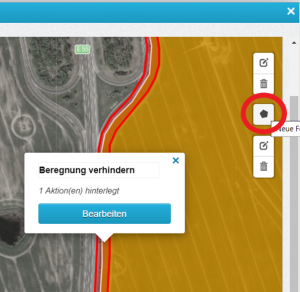
The "Prevent/Allow Irrigation" feature enables you to designate zones for sector control where irrigation is either prohibited or permitted beyond the field's boundary.
For instance, you can establish safety margins from roads or specify zones for irrigation that extend past the field's edge.
Ensure that zones marked for "Allow Irrigation" begin within the field boundaries—areas drawn adjacent to the field will be disregarded.
It's beneficial to know that these zones can be activated or deactivated via your smartphone. This allows you to irrigate based on the current usage of adjacent fields and adjust for wind conditions to avoid areas such as roads.
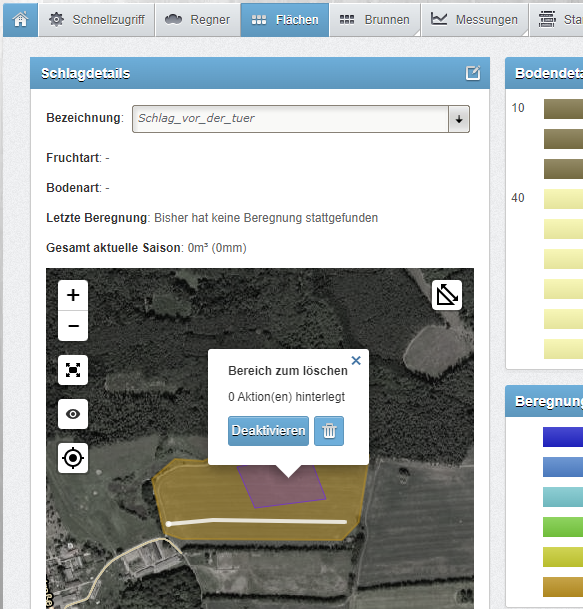
Delete or Deactivate Event Areas
You can easily deactivate or delete the event area of your choice via the "field detail" page or in the Raindancer app.
To do this, click on the event area that you want to deactivate or delete.
A new button will appear ![]()
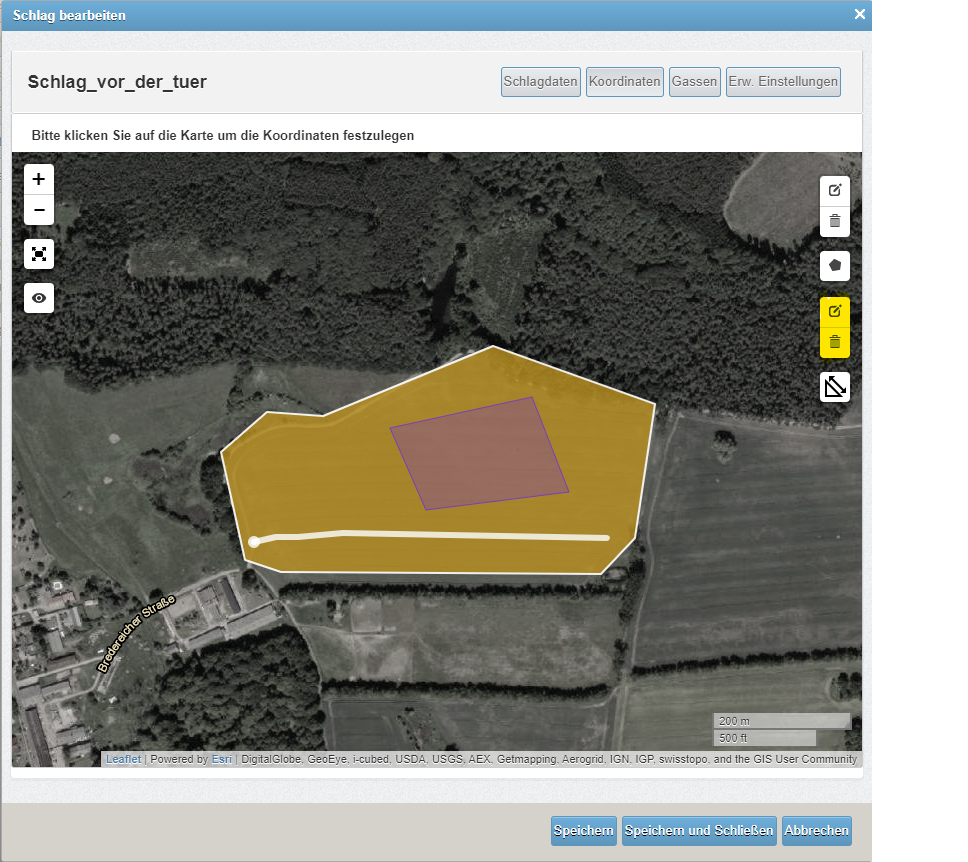
Delete event areas in field editing
You can effortlessly deactivate or remove the desired event area through the "Edit field" page. Simply click on "Coordinates" within the Edit field page. To delete an event area, select the lower trash can icon on the right side, choose the event area you wish to delete, and then click "Apply".
|
|
|
|
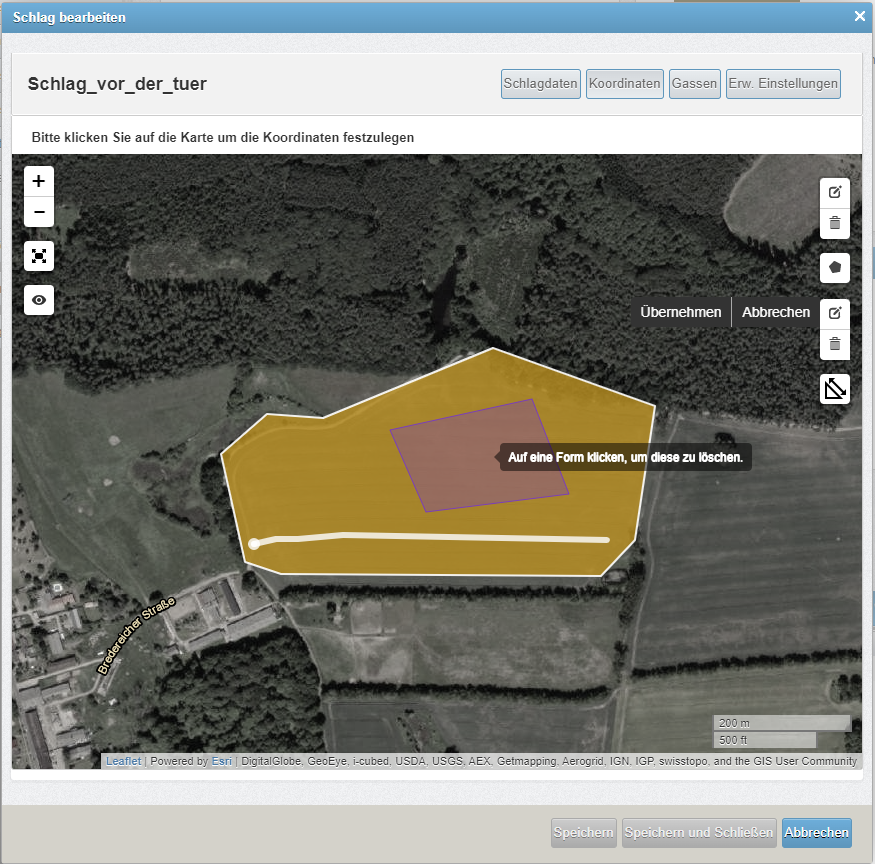
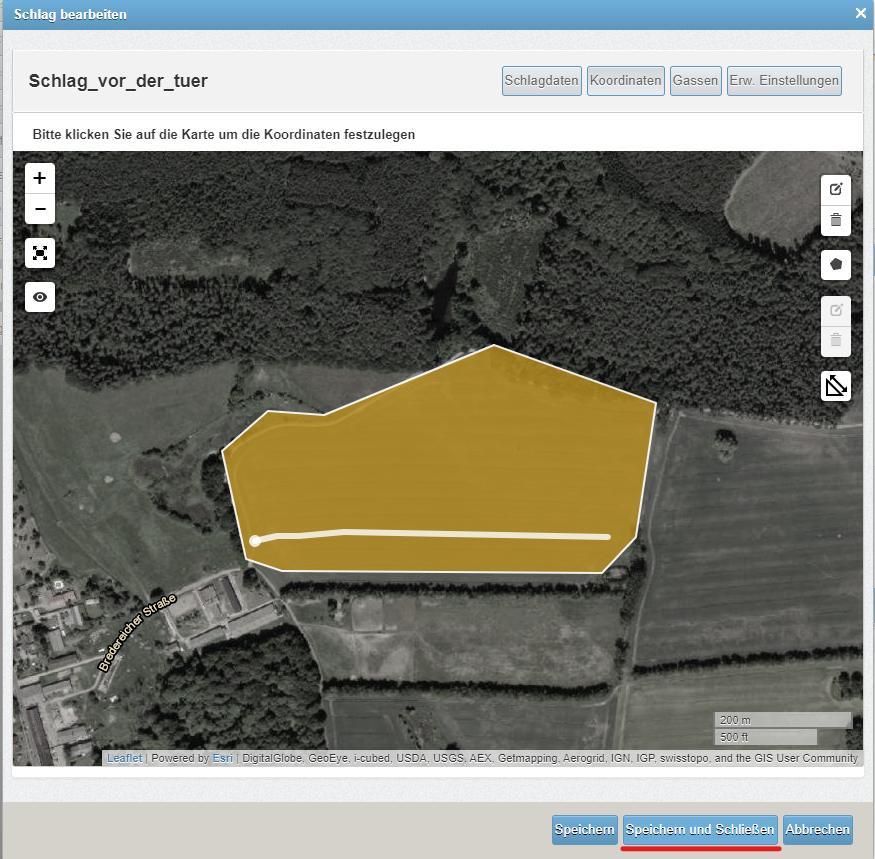
After you have clicked within the event area, it disappears from the map. Click on Save to apply the changes.
Event Areas and their Actions
Overview
It is possible to draw areas on the fields to trigger one or more of the following actions when entering or leaving:
- Send a message with customised text
- Send a command
- Stop active irrigation REMOTE CONTROL
- Change irrigation amount REMOTE CONTROL
- Change irrigation sector SECTOR CONTROL
- Set extended outputs REMOTE CONTROL
- Avoid irrigation SECTOR CONTROL
- Permit irrigation SECTOR CONTROL
- Cornering programme (for self-propelled) REMOTE CONTROL
Drawing in the Areas
How are these event areas and the corresponding actions stored?
To do this, select the field via Fields and go to Edit field, here to Coordinates.
Draw an event area via Create new shape ![]() .
.
(at the bottom right, you will see a dimension bar to help you draw the shape if you switch to "Full screen"  beforehand). When drawing, the last click must always go back to the first click.
Now edit the event area and select one of the options under Action.
Sending a message
You can send a message to yourself or another person, such as an employee, when the irrigator enters or exits an event area.
To achieve this, input the desired telephone number in the 'Recipient' field.
Sending a command
You can use the event areas to trigger one of the following commands when entering or / and leaving the event area.
- Stop active irrigation → Stops the current irrigation.
- Change irrigation quantity → Changes the amount of water in absolute (mm or m/h) or relative (in per cent) terms.
- Change irrigation sector → Adjusts the sector control.
- Avoid irrigation→ Prevents irrigation of the event area
- Permit irrigation→ Allows irrigation of the event area
- Set extended outputs
Special areas for sector control
There are areas that have been specially designed for sector control. These areas allow you to customise the sector control specifically to your requirements.
Change irrigation sector
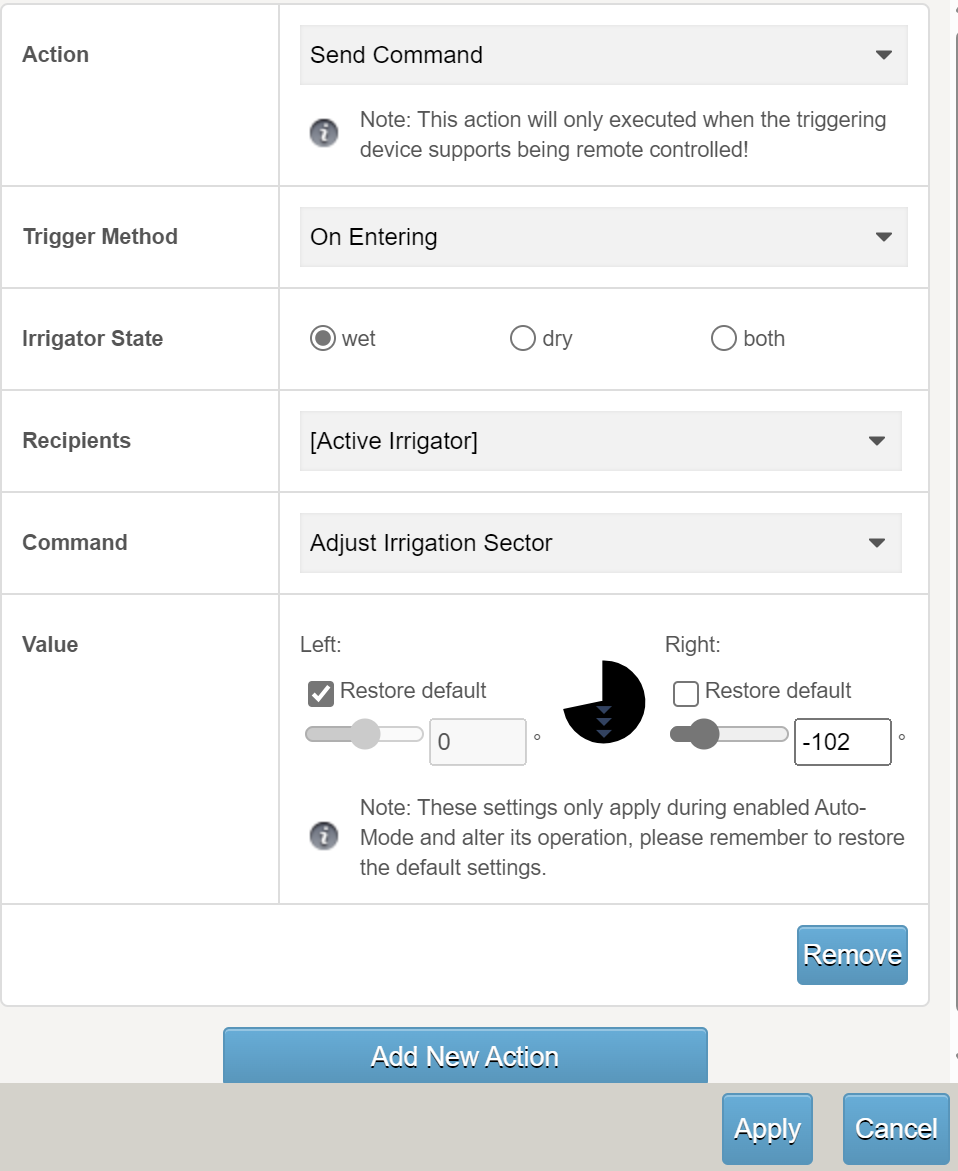
Here, you can specify the left and/or right stops for the drawn sector. Of course, it then takes the field boundaries into account based on these new stop angles.
When leaving the drawn area, you can switch back to the default (restore default).
If you do not enter anything for "on leaving", the settings for this irrigation programme remain active.
The default values will then be active again for the next operation.
Do not forget to Apply and Save!
Avoid Irrigation
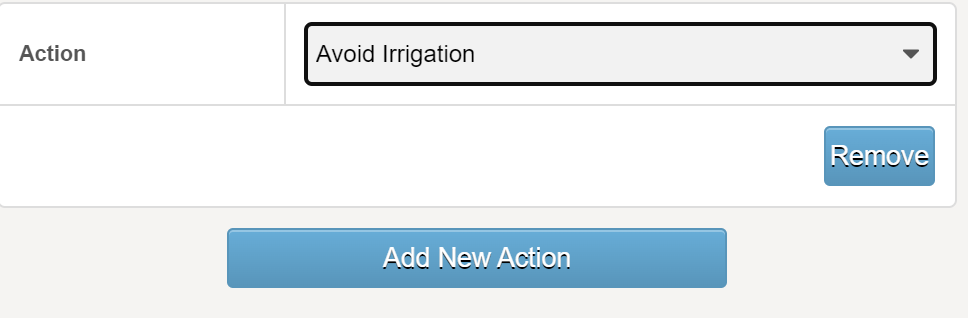
Example: You do not want to irrigate an area (e.g. a strip along the motorway) for safety reasons.
Then select the Avoid Irrigation action in the "Action" field.
Permit Irrigation
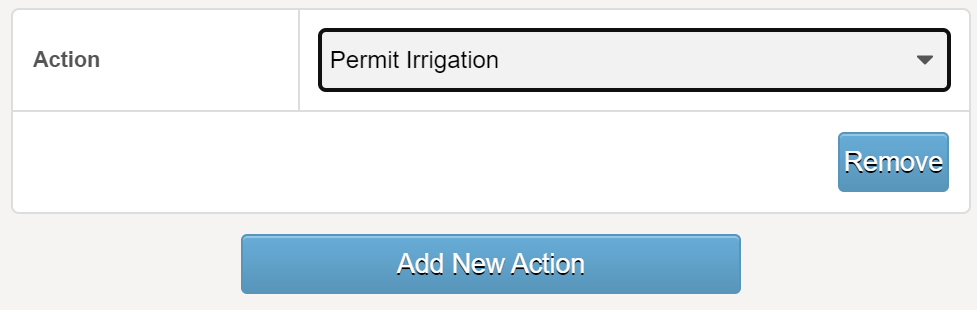
Example: You want to over-irrigate an area (e.g. a strip along the woodland border) to ensure that all the plants in your field get enough water.
Then select the "Permit Irrigation" action in the "Action" field.
Prevent double irrigation
Mark the "Avoid irrigation" area between the two Runs. Each run now only irrigates up to this area so that double irrigation is prevented.
This line should be a very narrow area - a triangle, for example. When drawing, the last click must always go back to the first - the area must be closed in this way!
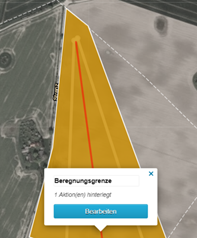
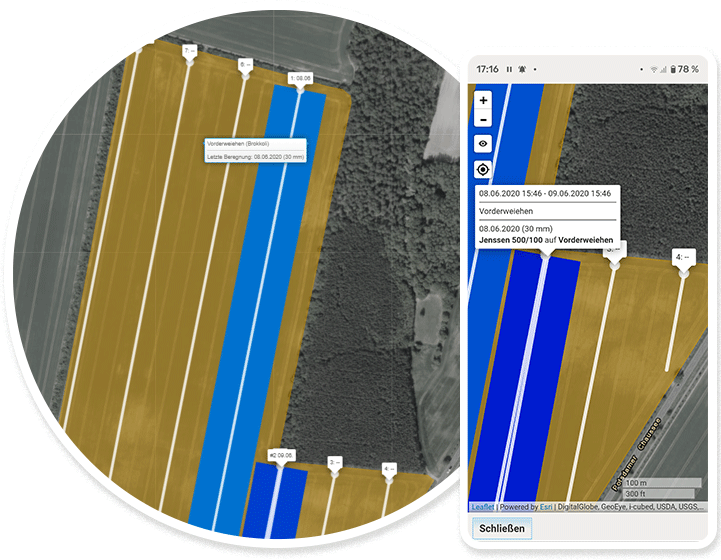
Create a Run
Irrigation runs permanently stores the path of the irrigation machine in the system. This information offers several advantages in the daily use of the Raindancer app and sector control.
Why do you need runs?
- Length of the irrigation path
If an irrigator starts on an run, the Raindancer recognises this and the length is known immediately. - Positioning of the hose reel
Especially if you do not position your hose reel exactly at the border of the field, e.g. in the headland, the irrigation system may not reach the field border. The exact location of the hose reel (the target point) is determined by the run. - Do you have irrigators that also run in a "curve"?
You can also use runs to draw curved paths.
This is particularly important if you are working with sector control to calculate the stop angles correctly. - Information on when and how much was irrigated here.
This is permanently displayed on the run:
- Last irrigation with date and quantity
- How much was irrigated on the alley in total this year? - Irrigation runs serve as the basis for certain reports.
Certain analyses within Raindancer rely on the allocation of water to specific sub-areas of the fields, such as the field evaluation report. - Runs are the basis for operational planning/implementation
Creating Permanent Runs from old operations
Once irrigating a field, you can create permanent runs from old irrigations. The runs
then remain permanently available.
This is how it works ...
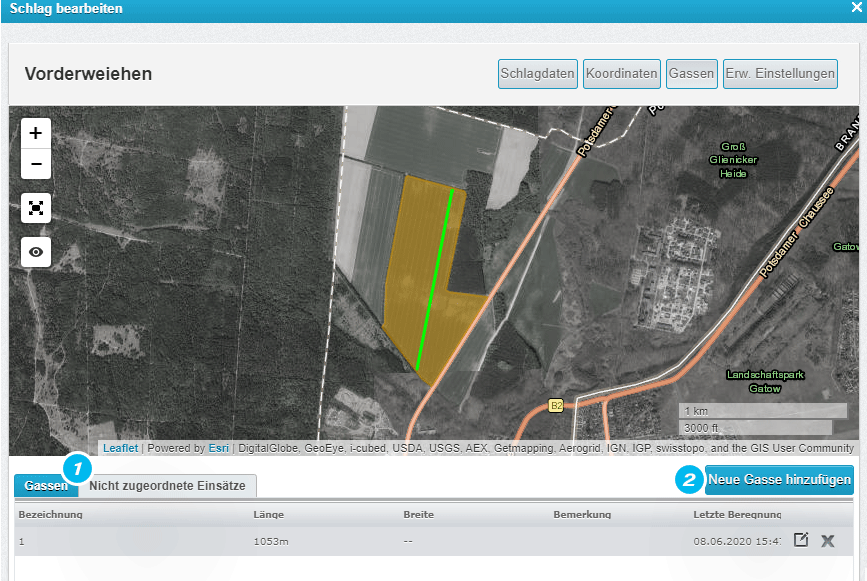
Select the field and go to edit  , then go to "Runs" [1]
In the table below the map, please go to " Unassigned operations" [2]
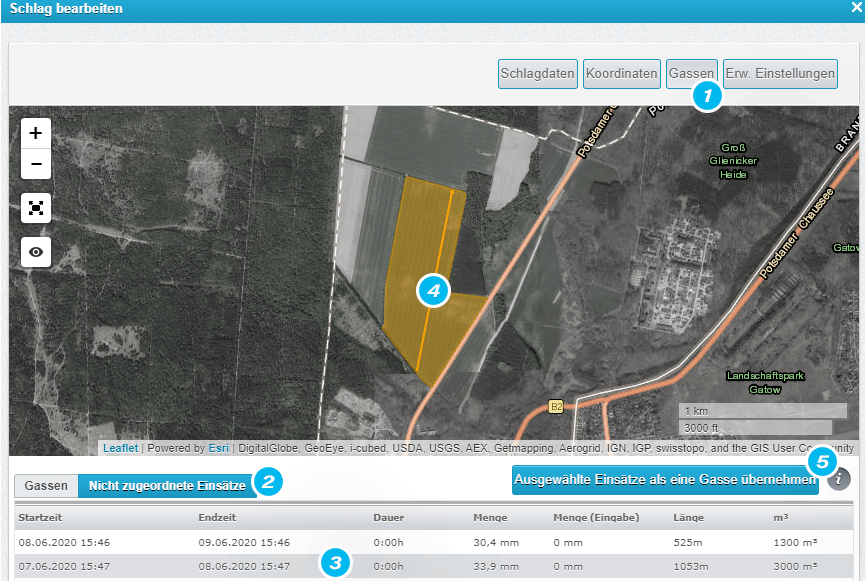
You can see all irrigation operations here.
Click on an run [3] to see it on the map. [4]
If you now click on the "Take selected missions assignments to a run" [5] tab at the bottom, an alley has been created.
Do the same with the other missions until you have created all the runs.
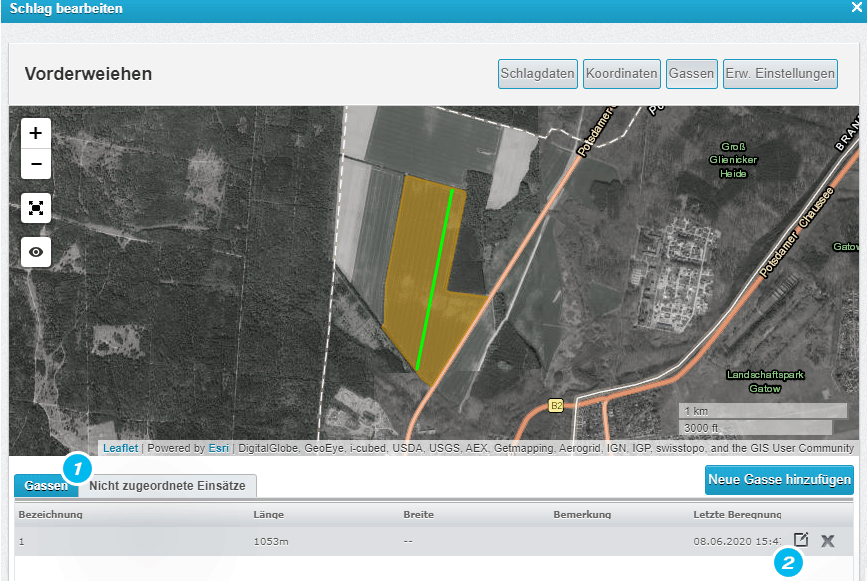
If you click on the "Runs" tab [1], you will see the transferred runs.
If you click on the Edit icon [2], you can change / add details for the run.
e.g. for irrigation in the headland width on the left side only 20 m.
Depending on the respective width, a semi-transparent area is displayed next to the run, which shows the working width,
to ensure a more precise marking of the run.
These two values (left and right width) are then used to visualise and calculate the irrigated amount.
Left / right always with a view from the hose reel to the trolley!
The runs are now permanently displayed on the fields with the information: when was the last time irrigation was carried out here.
Click on the alley to see the mm of the last irrigation and the total mm.
Of course also on the smartphone.
Draw a Run
- e.g. irrigation in the curve
A conventional hose reel can also irrigate in an arc, such as along the border of a field.
However, when using a hose reel that isn't self-propelled (unlike Fasterholt machines, which are), Raindancer will always plot a straight line from the starting point to the target. This typically isn't an issue, but with sector control, if the actual direction doesn't align with the start-to-target line, the stops could be miscalculated.
Therefore, it's advisable to manually draw these paths as runs.
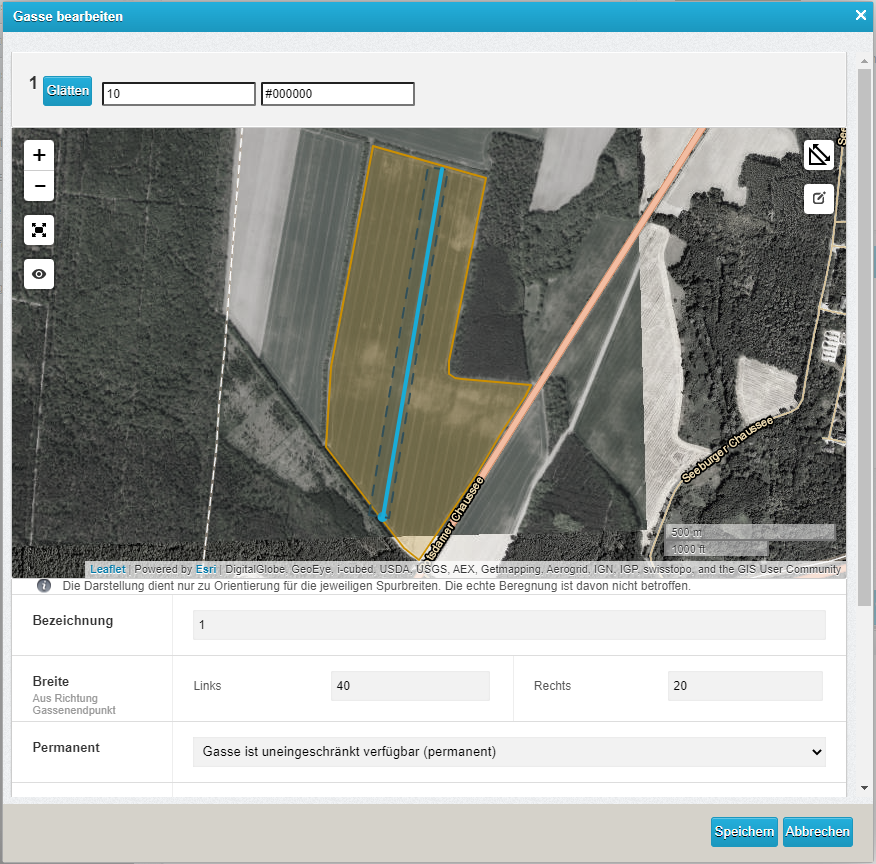
You can now use the icon ![]() at the top right to define the run using several points.
at the top right to define the run using several points.
Click with the mouse on the symbol for Add new Run highlighted in yellow in the image below.
Now draw the run on the field with the software.
Start where your hose reel stands!
Complete the drawing of the Run by double-clicking on the last point you set for the Run.
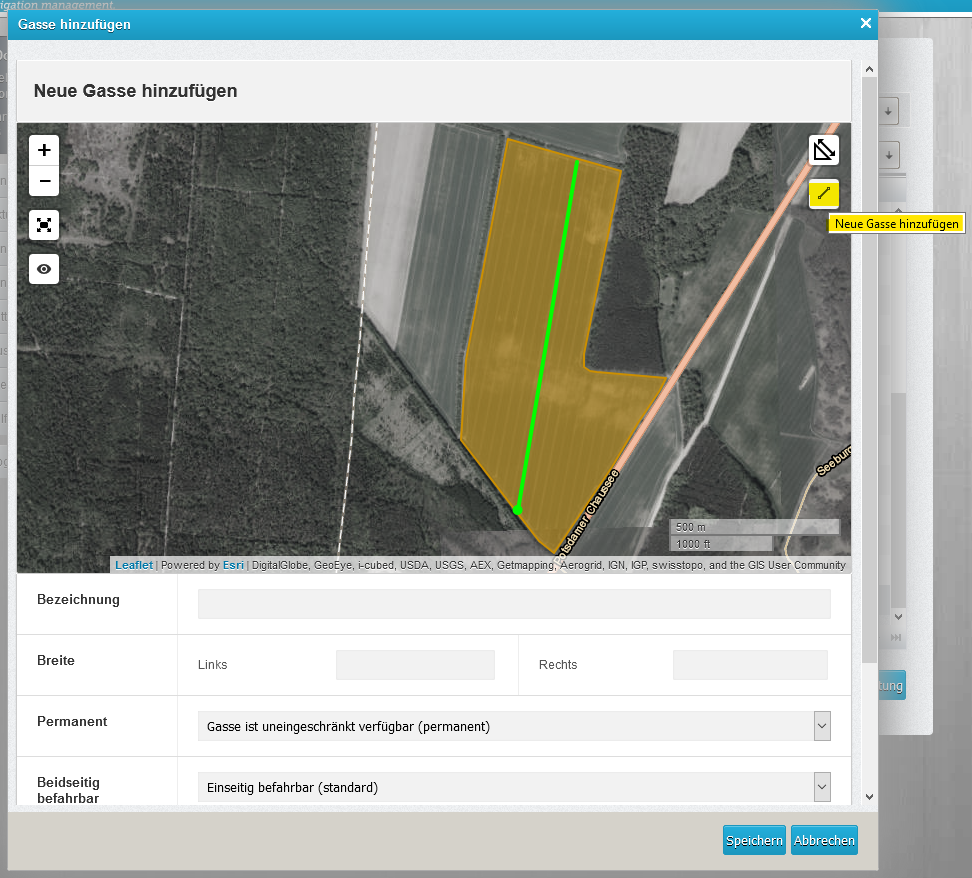
Give the run a name and add the width of the left and right sections of the respective Run.
If you wish, the Run can be deleted automatically after irrigation. To do this, change the settings in the Permanent field to "Run is available for one-time irrigation". Runs are always created "permanent" by default.
You have the option of changing the default setting "Permanent" to "Always once" in the advanced settings.
If you only want a specific irrigator type, such as a classic hose reel, to use a Run, select the relevant irrigator type from the list.
The irrigator that do not correspond to the irrigator type will ignore the Run. This prevents misunderstandings when automatically assigning Runs and irrigators.
If you wish, you can set whether a Run can be used on one or both sides. To do this, simply select the corresponding menu item under "Passable in either direction".
Permission for corner programmes allows you to set whether corner irrigation is allowed without having to change the setting on the irrigator.
You can find more information on the corner programme in the [irrigator control].
You can select Magnetic if you are sure that you have drawn the Run correctly.
This makes the sector on field boundaries more stable and does not constantly move back and forth two degrees, which saves the battery.
When the machine now irrigates on this Run, it knows the feed direction, length, etc.
If you are working with our sector control, the stop angles are calculated based on the current direction
When a machine initiates irrigation, it searches for the nearest "Run". This implies that it can execute runs on lanes that aren't identical to the real world - the Raindancer will find the Run regardless. Consequently, if two irrigation runs begin in proximity, both should be drawn to prevent the Raindancer from switching to an incorrect Run if it doesn't detect nearer one.
Deleting irrigation runs
- If you have not yet selected your field, proceed as follows:
- Select fields at the top centre
- To edit, click on the edit icon to the right of the field to be edited
- Select fields at the top centre
- Select Runs at the top right with a click
- Under the map under Runs listing, click on the icon
 to the right of the Run you want to be deleted
 - A pop-up window appears, asking you if you really want to delete this Run. You can confirm this by clicking on Yes.
- Click on the Save and close button at the bottom right to finalise the editing of the areas.

Auto Speed - The cruise control for irrigation
Automatic Speed adjustment via remote control on the hose reel
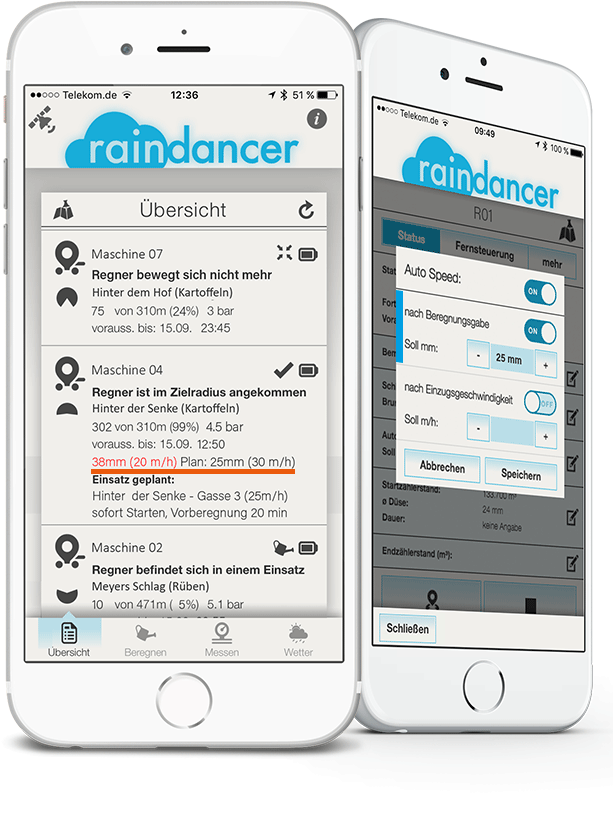
To use Auto Speed, you need an SMS or Internet control on the hose drum that allows you to set the speed.
Follow this guide to set up the control system
What do I have to do
![]() Set the irrigation amount in mm.
Set the irrigation amount in mm.
![]() The retraction speed is calculated and transmitted to the machine based on the nozzle diameter, the pressure and the working width.
The retraction speed is calculated and transmitted to the machine based on the nozzle diameter, the pressure and the working width.
Manual adjustment of the irrigation quantity
(without remote control on the hose reel)
In the Raindancer app, you can specify the desired irrigation amount in millimetres. Once irrigation begins and pressure is applied, the app displays the necessary retraction speed in meters per hour.
Here's how to use it:
Select the drum icon and navigate to Auto Speed.
![]() Here, you can input the desired millimetres. This value will remain until you decide to change it.
Here, you can input the desired millimetres. This value will remain until you decide to change it.
![]() Once pressure is applied, the app will indicate the appropriate speed to achieve this millimetre dosage in the plan values.
Once pressure is applied, the app will indicate the appropriate speed to achieve this millimetre dosage in the plan values.
Please note that any subsequent changes in pressure are not automatically adjusted for; to manage this, a remote control for your reel is required.
The Master Data - Crops and Soils
Within this section of the Raindancer System, you oversee the management of crops, units, and soils.
Entering the types of crops enables quick identification of which crop is cultivated in each field when viewing the field section.
It's possible that after importing, the names might be represented as numbers. These can be modified at any time subsequently.
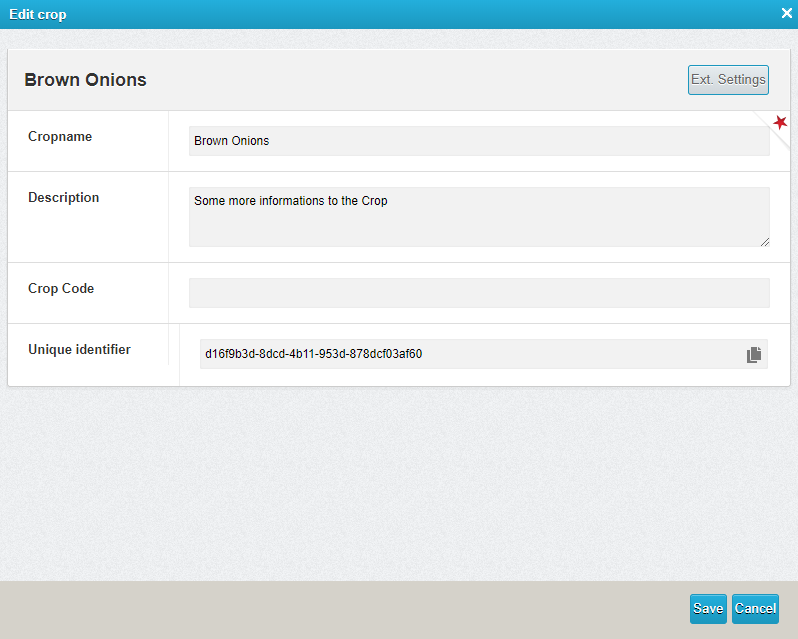
Customise Your Crops
Crop types are mainly used to provide a clear overview of the various lists. They make it easier for new employees to find their way around.
- In the raindancer portal, select Master Data at the top right, then Crops
- Click on the edit icon
 to the right of the crop you want to edit
 - To create, click on the "Add new crop" button at the bottom left
- Click on the edit icon
- Here you can change the crop name and description fields
- Optionally, you can also adjust the irrigation cycle by clicking on "Extended settings" (top right). The default value is set to 10 days. Changes can be saved by clicking on "Save and close".
- Confirm by clicking on the "Save" button.
Soils
Preparing soil is only necessary if you intend to irrigate weather stations or on demand.
A catalogue offers 12 distinct soil substrates for this purpose. They can be assembled into 10 cm blocks to create the soil. This soil can then be applied to fields for determining soil moisture. The layered substrates yield a staggered field capacity at depth.
This value indicates how well a soil can hold water against gravity.
-
In the raindancer portal, select Master Data at the top right, then Soils types
-
To edit, click on the edit icon
to the right of the soil you want to edit -
To create, click on the "Add new soil" button at the bottom left
-
-
Here you can change the Soil name and Description fields
-
After saving On the Substrates tab, you find the option to structure your soil from top to bottom.
-
Confirm by clicking on the "Save" button.
Plan Future Operations
This section of the Raindancer portal is designed to enable you to plan your assignments in advance and thus bring more structure to your work dynamics.
You will find the operation scheduling in the portal on the left-hand side in the ribbon.
Runs to your fields are required for planning operations. See also Create a Run
Plan New Operation
To plan a new deployment, navigate to the " Operations Schedule" item via the left-hand bar.
Click on the "Operations Schedule" area to access the overview of all planned operations. So that you can plan a new missions,
Click on the "Plan a new mission" button in the bottom right-hand corner.
Select the Field
A new screen will open in which you can select the field on which you plan your operation. If you have numerous fields, you can also search for a specific field by entering the name in the search bar.
Select your Irrigator
Once you have decided on a field, the next step is to select the irrigator you want to use on the field.
Once you have completed both steps, you will see the new planned application in your overview. By clicking on the application, you will be allowed to edit it in more detail. You can then change the irrigator, set or adjust the feed speed, specify the amount of water per mm, change the sequence and make a comment.
You can print out all of the planned operations on paper. To do this, click on the "Print" button in the bottom left-hand corner. You will now see a print preview.
Delete
If you want to delete the operation, you can also do this in the operation overview. You will find the symbol of a recycling bin
Units - Metric or Imperial
Changing the units in the Raindancer system is centralised and affects all outputs in the entire system.
You can find the settings for this under Master Data ⇾ Units
At the top you will find the switch between a predefined metric set of units or an imperial set of units.
Conversion between the metric and imperial systems can lead to unusual rounding and decimal values.
Under the simple switching between the systems you will find the individual unit categories used in the Raindancer system.
To change individual units, uncheck Use default and then select your preferred unit from the selection box.
Click on Save and your system will now show you the selected unit in the selected category.
Irrigatior Control - Remote control of irrigation
Access to the control system is a pivotal aspect of operating the Raindancer for your irrigation machinery, provided that your equipment includes at least an SMS-based control system.
By adjusting the intake speed according to the volume of water dispensed and the operational width, you can optimize water conservation through AutoSpeed.
Setting up the control system
You can find the setting to save the irrigation machine in the upper menu ribbon under Irrigators. Here you can then select the machine for which you want to save the controller or create a new machine using these instructions,
Then click on the Edit button and switch to the Setup and Controls tab.
At this point, select the make of your irrigation computer from the selection. Different models and variants from various manufacturers are available here.
Please ensure that your computer has the option of being controlled via SMS and that the computer has been configured in accordance with the instructions for your specific make to ensure smooth integration.
Follow your manufacturer's instructions to achieve communication with the Raindancer system.
Telephone Numbers
A telephone number must be saved in your computer to which replies can be sent.
| +31 97014444993 |
In addition to SMS control, if a compatible API is set up, you can choose API control for an irrigator through the control type option. To ensure the control functions properly, select the API name given during the setup process and input the identification extension, such as the serial number, for the device's corresponding API.
BEINLICH 2KR/H
Make sure that your irrigation computer is operated in Raindancer mode. Otherwise, the system will not be able to process the machine's responses correctly.
Phone no.
This field is visible for SMS-based control types.
Please enter the telephone number of your irrigation computer here.
API-Name
OPTIONAL
This field is only visible for API-based control types. Enter the identifier of the device used for the API here.
Control Unit
OPTIONAL
This field is only visible for API-based control types. Enter the identifier that was assigned during the API configuration here.